Login to cooktime24 in order to save your favorite recipes
If you have not registered yet, register now!

This uni pasta or sea urchin pasta recipe was created a while ago for an old blog. I adapted the recipe from Eat A Duck I Must. I have never posted this recipe on Rasa Malaysia and thought this is a great recipe to share here. It’s a perfect dinner date recipe if you want to impress your guests or your significant other. If I am not mistaken, uni pasta is made famous by celeb chef extraordinaire Eric Ripert. I remember watching a TV program where Eric made his famous signature dish. The briny taste of fresh sea urchin, heavy cream, and cheese paired perfectly in this rich, creamy, and utterly delicious dish. This weekend, instead of making Asian food, try this uni pasta at home. We absolutely loved it when I made this. And while you are at it, you can sip your favorite white or red wine. It’s totally up to you! (Click Page 2 for the Uni Pasta (Sea Urchin Pasta) Recipe)
Source: rasamalaysia.com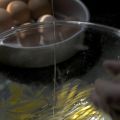
You can’t buy this kind of mayonnaise. Photo by Donna Turner Ruhlman. Yet again finishing up a manuscript with mayonnaise on my mind, and I always think of Donna’s lovely images, captured when spring light was coming through our kitchen window. I could look at these forever (and now, as I couldn’t five years ago, I can post them to Twitter). Thanks, Donna! And remember, the emulsion is less about the yolk than about the liquid. Originally posted on May 21, 2008 Finishing up the revisions of a manuscript and going over some fat-based sauces has returned me to the mayonnaise. Like the popover , it’s the story of a great transformation. Yolk, lemon juice, salt, and oil. There simply isn’t anything like it when you make it yourself—you can’t buy this stuff. But I’ll bet you have everything you need to make it right now. I’ll include a recipe at the end of this post. Two things are critical to remember for those who have never made a mayonnaise. You need enough liquid (water or lemon juice) to maintain the emulsion, so don’t skimp on this. Second, begin adding the oil very slowly, just a couple drops of oil off the end of a spoon into the yolk while whisking, then another few drops. This establishes the emulsion. Then you can add the oil in a steadier stream. Donna took these pictures several weeks ago using natural light in our kitchen and frankly, they’re why I wanted to post about mayonnaise. But I hope they inspire you to make your own. You will have taken a tasteless fluid oil and transformed it into an ethereal sauce through craftsmanship and care. Add a tablespoon of minced shallot, and maybe a little extra lemon juice for an extraordinary dipping sauce for an artichoke, or blanched and shocked cauliflower, or to put on some boiled new potatoes. It’s magical stuff. Or just put it on a BLT —it’ll be the best sandwich you’ve had in a long time. Here’s the recipe adapted from Charcuterie : Mayonnaise 1 large organic egg yolk 1/2 teaspoon/5 grams salt 1 teaspoon/5 milliliters water 1 teaspoon/5 milliliters lemon juice (or 2 for a lemony mayo) 1 cup/250 milliliters vegetable oil Combine the yolk, salt, water, and lemon juice in a 2.5-quart bowl. Fold a hand towel into a ring on the counter and set the bowl in this ring to hold it steady while you whisk. Using a sauce or balloon whip (whisk), stir the ingredients together. Add the oil slowly while whisking vigorously. It helps to measure out your oil into a cup that pours well in a wire-thin stream; alternatively, you can start your emulsion by drizzling the oil off a spoon, then pouring the oil after the emulsion has begun. Add a few drops of oil as you begin to whisk; when the emulsion becomes creamy, you may increase the speed with which you add the oil to a thin stream. From the beginning the mixture should be thick enough to hold its shape and look luxuriously creamy. Add the oil too quickly and it will break, that is, it will turn soupy. When all the oil is incorporated, add additional lemon juice to taste. If the mayonnaise is too thick, it can be thinned by whisking in a little water. If it breaks, put a teaspoon of water in a clean bowl and start the process over by drizzling in the broken mayonnaise while whisking. URGENT UPDATE AND MSG TO BECKS & POSH AND RIPERT : From Shannon at momwantsacure : “Ha!! I just proved Eric Ripert and Becks & Posh WRONG!!!!! Tell them that menstruating women can make a fabulously perfect mayonnaise!” If you liked this post on homemade mayonnaise, check out these other links: My post on the Badass Perforated (aka egg) Spoon —use melted butter and three eggs whipped over gentle heat for Hollandaise and eggs benny! Here are some ideas on different flavor combinations for deviled eggs . Personality type can be determined by how you eat an egg. 11 other uses of mayo from Reader’s Digest, which includes cleaning piano keys. © 2013 Michael Ruhlman. Photo © 2013 Donna Turner-Ruhlman. All rights reserved
Source: ruhlman.com
After taking a break for the holidays, Sweet Melissa Sundays is back this week! If you're a new reader, Sweet Melissa Sundays is a group that is baking its way through The Sweet Melissa Baking Book ; we only have 16 recipes remaining so we're nearing the end. We'll be posting every other Sunday from here on out and this week our recipe was chosen by Candy of Candy Girl : hazelnut raspberry layer cake. I know it's January, which means lots of people have sworn off rich desserts like this cake, but I was pretty excited for it because I recently acquired 6" cake pans, which meant I could halve the recipe and still make a layer cake instead of resorting to cupcakes to scale back. Don't get me wrong, I love cupcakes but it's nice to have options. This cake is a variation on one we've made before for the group - toasted hazelnuts are ground with sugar to make hazelnut flour, which is combined with nutty browned butter (as well as vanilla, all-purpose flour, and baking powder) to form a thick batter. The batter is lightened by folding in egg whites that have been whipped with sugar to create a meringue. As they bake, the cakes puff quite a bit and then they shrink as they cool. Mine sunk just slightly in the center, but it was nothing a little frosting couldn't fix. Speaking of the frosting, the recipe was for an Italian meringue buttercream flavored with raspberries and raspberry liqueur. Italian meringue buttercream is made by pouring a sugar syrup that's been heated to 240 F into a mixer bowl containing a meringue (egg whites and sugar whipped to stiff peaks) and beating. Then, butter (and lots of it!) is added and the frosting is beaten until it comes together. I was wary about adding whole raspberries that had been soaked in raspberry liqueur to the frosting, as the book directed. I wanted a silky, smooth frosting, so instead, I made a simple raspberry puree (by heating raspberries on the stove top with just a tiny amount of water until they broke down, and then straining to remove the seeds and other solids). I added the puree little by little until I achieved the color and taste I wanted - probably a few tablespoons total for my half frosting recipe. The filling between the layers of the cake was simply seedless raspberry preserves. After assembling the cake, I piped a few swirls on top and added fresh raspberries for garnish. I wasn't able to smooth the frosting on the sides of the cake as well as I'd have liked, but otherwise, I thought it turned out well. The cake portion was delicious - nutty from the hazelnut flour and browned butter, and very moist. I don't recall previously having tried the hazelnut/raspberry combo, but it worked for me. The frosting was just ok; I know it's an odd complaint for a buttercream, but this one was too buttery. I've made other Swiss meringue buttercreams I liked and would use one of those in the future for this cake. Many thanks to Candy for hosting this week! You can find the recipe for the cake on her blog or on pages 119-121 of The Sweet Melissa Baking Book . {Two quick final notes: First, I just wanted to remind you one last time (I promise) that I'm hosting a giveaway and today is your last chance to enter to win a copy of Eric Ripert's new book, Avec Eric . You can find the details here :) Second, yesterday I mentioned that I received a Speedlite for Christmas. Subsequently, several readers asked for more information about it. So, here's a link to a tutorial from White on Rice that has lots of great information and this is what my Speedlite looks like.}
Source: traceysculinaryadventures.blogspot.com
For Christmas this year, I received a few gifts that were camera-related. One that I've really enjoyed playing with for the past few weeks has been my Speedlite flash. It's opened up a whole new world - one in which I don't have to plan to take all of my pictures for this blog before 4 pm when the sun sets. We're still very much in the "figuring it out" phase, but I love that I can now photograph our dinners on occasion and share them with you! It's always bummed me out a little when we try delicious recipes at night in the winter and they don't make it to the blog, so I'm hopeful that'll all be changing now. This salmon was one of the first recipes I flagged in the new Barefoot Contessa book when I picked it up a few months ago. I love simple weeknight dishes, and this one definitely falls into that category. Salmon fillets are brushed with Dijon mustard then topped with a panko breadcrumb mixture before being seared briefly on the stove top and finished in the oven. From start to finish, it's 30 minutes or less. The dish was a big hit here - the fish was rich with just a bit of tang from the mustard and the crispy panko topping was a nice contrast in texture. I bet it'll be even better next time we make it, when *hopefullly* I'm more comfortable with the Speedlite so we can eat our dinner while it's still hot :) Luckily, Shane's a good sport, as we've eaten more than our fair share of lukewarm dinners recently! {Tomorrow is the last day to enter my giveaway for a chance to win a copy of Eric Ripert's new book, Avec Eric! You can enter here if you haven't already!} Panko-Crusted Salmon adapted just slightly from Barefoot Contessa, How Easy is That? by Ina Garten 2/3 cup panko breadcrumbs 2 tablespoons minced fresh parsley grated zest of 1 lemon 2 tablespoons extra virgin olive oil 4 (6-8 oz) salmon fillets, skin on 2 tablespoons Dijon mustard 1 tablespoon canola (or vegetable) oil lemon wedges, for serving Preheat oven to 425 F. Combine the panko, parsley, lemon zest, 1/2 teaspoon kosher salt and 1/2 teaspoon freshly ground black pepper in a small bowl. Add the olive oil to the bowl and stir until all of the crumb mixture is evenly coated with the oil. With the salmon fillets skin side down on a work surface, use a pastry brush to spread the mustard generously over the tops of the fillets. Season the fillets with kosher salt and freshly ground black pepper, then distribute the crumb mixture evenly over the fillets and press to adhere. Heat the canola oil in a large ovenproof skillet over medium-high heat. Add the salmon fillets, skin side down, and sear for 3-4 minutes to brown the skin. Transfer the skillet to the oven and bake for about 5-7 minutes, or until the salmon is just about cooked through, and the panko mixture has browned. Remove the skillet from the oven, cover loosely with aluminum foil and let rest for 5-10 minutes. Serve with the lemon wedges.
Source: traceysculinaryadventures.blogspot.com
Just as my blog celebrated its 3rd birthday last week, it's time to mark another special occasion today - the 3rd anniversary of Tuesdays with Dorie ! I've been baking with the group since April of 2008, and it's still crazy to me sometimes to think it's been over two and half years. It thrills me to know that eventually I will have made just about every recipe in the book, and that all I have to do is scroll back through my blog posts to recall how I felt about each and every one of them (an eminently useful tool for someone with a memory as terrible as mine). Many thanks to Laurie of Slush , who founded Tuesdays with Dorie back in January of 2008, and has kept the group running, even as membership climbed to levels she never imagined. This week's recipe was midnight crackles, a dark, intensely chocolate cookie that was a cinch to whip up. The biggest tip I'd offer this week - don't leave the dough in the fridge for too long before shaping the balls for baking. Dorie recommends at least an hour or up to 3 days; I left mine in for several hours, and when I removed it from the fridge it was hard as a rock. The thermostat is set at a fairly chilly 60 F in my house most of the winter, and at that temperature it took forever for the dough to warm up enough that I could form it into balls without injuring my hands. Also, the cookies don't spread much in the oven so it's not necessary to leave much space between them on the baking sheets. I made 1/2 recipe and wound up with about 27 cookies. The very first recipe I ever posted on my site back in December of 2007 was these chocolate crinkle cookies . To this day, it's the single most-requested recipe by Shane - anytime I throw out the question "What should I make today?" the response is always chocolate crinkle cookies :) The recipes are similar enough that I wondered whether these crackles might dethrone the crinkle cookies... Well, the answer was no (it's becoming more and more clear that the chocolate crinkles might never relinquish their top spot) but the crackles were still a big hit. Shane ate most of ours in 2 days if that's any indication. I liked them a lot too; they were dark and rich, the kind of cookie that screamed for a glass of milk on the side, in my opinion. Laurie and Jules of Someone's in the Kitchen selected this week's recipe, which can be found on the Tuesdays with Dorie site here or on page 74 of Baking: From My Home to Yours . {PS - I'm hosting a giveaway for a copy of Eric Ripert's new book Avec Eric ! You can enter here if you haven't already.}
Source: traceysculinaryadventures.blogspot.com
A few weeks ago, a close friend contacted me to see if I'd be interested in a copy of Eric Ripert's new book, Avec Eric . The immediate answer was "absolutely" - I was already in the queue at my library waiting to borrow a copy of the book so I could check it out. I was thrilled when my friend's contact at the publishing company graciously sent me not one, but four copies of the book, and I am so excited to be giving away three of them today to say thank you to all of you for your support and for inspiring me to continue working hard in my kitchen! For those who don't know, the author, Eric Ripert, is the chef and co-owner of the celebrated restaurant, Le Bernardin in New York. You may also have seen him appearing as a guest judge on Top Chef, or on his PBS show, Avec Eric, on which the new book is based. One of the biggest reasons I was interested in the book was because it's more than just a cookbook. Each chapter is a glimpse into a different travel adventure with Ripert; he explores a region, learning about its people, food and traditions and then provides a collection of recipes which were inspired by his visit to that region. Two of my favorite chapters in the book were the first, describing a visit to Chianti, Italy which included hunting wild boar, and one detailing his connection to and experiences in the Cayman Islands (Shane and I have been twice and it's a stunning destination). Gorgeous photos document the trips throughout, so this book would be equally at home on your coffee table, or among your other cookbooks. As for the recipes themselves, I worried a bit that they might be complicated - either in length or technique - but there's quite a nice mix, something for every level of cook. Though seafood recipes are definitely one of the focuses of the book, recipes for other proteins are included as well appetizers, soups, salads, cocktails, and a few desserts. If you're curious, several of the recipes are featured on the show's website, which can be found here . I wanted to make at least one recipe to share today in conjunction with the giveaway, and I'd flagged several as I read through the book. When people pose the hypothetical question "If you could only eat one food for the rest of your life, what would you pick?", I can never make up my mind, but caramelized onions are definitely on the short list so it's probably not surprising that I kept coming back to this simple tart. Its ingredient list is short, but enticing: buttery, flaky puff pastry acts as the base for sweet caramelized onions, which are topped with my favorite cheese, nutty Gruyere. The only change I made was to substitute the thyme in the recipe with rosemary, as it was all I had on hand. The tart was simple enough to whip up amidst the holiday chaos and was every bit as delicious as I'd imagined it would be. It was definitely best slightly warm from the oven, but I gladly snacked on pieces at room temperature as well. I'm really looking forward to having time to try additional recipes from the book now that the holidays are over! How To Enter To enter to win a copy of Eric Ripert's Avec Eric, just leave a comment on this post telling me your favorite travel destination, or the destination you'd most like to visit next. Maybe it's a beach vacation, a ski destination, or one of the many bustling cities around the world...I can't wait to hear! To receive bonus entries: 1. Follow @twilhelmsen on Twitter. Come back and let me know you are following by leaving an additional comment. 2. Subscribe to Tracey's Culinary Adventures via RSS or Google Friend Connect (using the widget at the bottom of the right sidebar). Come back and let me know you've subscribed by leaving an additional comment. Comments on this giveaway will close on Sunday, January 9, 2011 at 11:59 pm EST. Three winners will be chosen using random.org and emailed. The giveaway is open to U.S. residents only. Good luck! ** Updated : Comments are now closed. Winners will be announced tomorrow!** Disclaimer: The copies of Avec Eric were provided to me at no cost by the publisher, but this is not a sponsored post and the opinions expressed are my own. Caramelized Onion & Gruyere Tart adapted slightly from Avec Eric , by Eric Ripert 1/4 cup olive oil 2 large onions, sliced thinly 2 sprigs of thyme 1 small garlic clove, thinly sliced 2 sheets frozen puff pastry, thawed 1/2 cup grated Gruyere cheese Unfold one sheet of puff pastry on a lightly floured surface. Roll lightly until the sheet is an 11x11-inch square. Use a small plate or other round template to cut two 6-inch circles from the sheet of puff pastry. Repeat with the second sheet so you have four 6-inch circles in total. Place the circles on parchment lined baking sheets and refrigerate until ready to use. Preheat oven to 450 F. Heat the oil in a 12-inch skillet over medium heat. Add the onions, thyme, and garlic to the pan, stirring to coat. Cook, stirring occasionally, until the onions begin to soften and release some moisture, about 10 minutes. Reduce the heat to medium-low and cook, stirring frequently, until the onions are deeply browned, about 30 more minutes. Season to taste with salt and pepper. Remove the baking sheets from the refrigerator. Distribute the caramelized onions evenly among the four puff pastry rounds, leaving about 1/2-inch border around the edges. Top the onions with the grated Gruyere. Bake for 13-17 minutes, or until the pastry is golden brown and puffed. Cut the tarts into wedges and serve warm.
Source: traceysculinaryadventures.blogspot.com
2 tablespoons olive oil 1/2 cup chopped shallot 2 garlic cloves , minced 2 lbs tomatoes , peeled, seeded, and cut into 1/2-inch pieces 2 lbs cod fish fillets , cut into 6 equal portions 1 1/2 cups cooked small white beans (RESERVE 1/4 C COOKING LIQUID or use water) or 1 1/2 cups cannellini beans (RESERVE 1/4 C COOKING LIQUID or use water) or 1 1/2 cups borlotti beans (RESERVE 1/4 C COOKING LIQUID or use water) truffle oil (to garnish) (optional) 1 Heat oven to 350°F. 2 Heat 1 tablespoon extra-virgin olive oil in a saucepan over medium-high heat, add the shallots and garlic, and sauté for 1 minute. Add the tomatoes and season with salt and pepper. 3 Reduce heat to medium low and cook the tomatoes until all the liquid has evaporated, but the tomatoes are still slightly chunky. 4 While the tomatoes are cooking, heat the remaining tablespoon of oil in a large frying pan over high heat. Season both sides of the cod with salt and freshly ground black pepper, and sear each side for about 2 minutes, or until nicely browned. When the fillets are seared, place them on a baking sheet. Put cod in the oven to finish cooking. (According to Chef Ripert, an easy test for doneness is to insert a metal skewer into the center of a fillet for 5 seconds. The fish is done when the skewer goes in easily and, when removed, feels slightly warm to your lip.). 5 Place 1/2 cup of the beans in a food processor with the reserved bean-cooking liquid and purée until smooth to make the sauce. Season to taste with salt and pepper. 6 To serve, spoon tomato compote in the center of each plate and place a cod fillet on top. Spoon bean sauce outside the compote, and sprinkle reserved whole cooked beans around the fish and over the two sauces. Drizzle with tiny drops of truffle oil.
Source: food.com
2 tablespoons extra virgin olive oil 3 garlic cloves , thinly sliced 1 small onion , thinly sliced 1 1/2 lbs small zucchini , cut into 1/2-inch dice 7 saffron threads 1/2 teaspoon ground cumin 1 pinch ground turmeric salt fresh ground white pepper 1 1/2 tablespoons fresh lemon juice 1 tablespoon chopped mint 1 Heat the olive oil in a large saucepan. Add the garlic and onion and cook over moderate heat, stirring, until softened, about 4 minutes. Add the zucchini, saffron, cumin and turmeric and season with salt and pepper. Cook, stirring occasionally, until barely tender, about 8 minutes. 2 Transfer to a bowl and refrigerate until chilled, about 20 minutes. 3 Stir in the lemon juice, season with salt and pepper and sprinkle with the mint. Serve chilled or at room temperature.
Source: food.com
2 tablespoons olive oil 1/2 cup chopped shallot 2 garlic cloves , minced 2 lbs Tomatoes , peeled, seeded, and cut into 1/2-inch pieces 2 lbs cod fish fillets , cut into 6 equal portions 1 1/2 cups cooked small white beans (RESERVE 1/4 C COOKING LIQUID or use water) or 1 1/2 cups cannellini beans (RESERVE 1/4 C COOKING LIQUID or use water) or 1 1/2 cups borlotti beans (RESERVE 1/4 C COOKING LIQUID or use water) truffle oil (to garnish) (optional) 1 Heat oven to 350°F. 2 Heat 1 tablespoon extra-virgin olive oil in a saucepan over medium-high heat, add the shallots and garlic, and sauté for 1 minute. Add the tomatoes and season with salt and pepper. 3 Reduce heat to medium low and cook the tomatoes until all the liquid has evaporated, but the tomatoes are still slightly chunky. 4 While the tomatoes are cooking, heat the remaining tablespoon of oil in a large frying pan over high heat. Season both sides of the cod with salt and freshly ground black pepper, and sear each side for about 2 minutes, or until nicely browned. When the fillets are seared, place them on a baking sheet. Put cod in the oven to finish cooking. (According to Chef Ripert, an easy test for doneness is to insert a metal skewer into the center of a fillet for 5 seconds. The fish is done when the skewer goes in easily and, when removed, feels slightly warm to your lip.). 5 Place 1/2 cup of the beans in a food processor with the reserved bean-cooking liquid and purée until smooth to make the sauce. Season to taste with salt and pepper. 6 To serve, spoon tomato compote in the center of each plate and place a cod fillet on top. Spoon bean sauce outside the compote, and sprinkle reserved whole cooked beans around the fish and over the two sauces. Drizzle with tiny drops of truffle oil.
Source: food.com
2 tablespoons extra virgin olive oil 3 garlic cloves , thinly sliced 1 small onion , thinly sliced 1 1/2 lbs small zucchini , cut into 1/2-inch dice 7 saffron threads 1/2 teaspoon ground cumin 1 pinch ground turmeric salt fresh ground white pepper 1 1/2 tablespoons fresh lemon juice 1 tablespoon chopped mint 1 Heat the olive oil in a large saucepan. Add the garlic and onion and cook over moderate heat, stirring, until softened, about 4 minutes. Add the zucchini, saffron, cumin and turmeric and season with salt and pepper. Cook, stirring occasionally, until barely tender, about 8 minutes. 2 Transfer to a bowl and refrigerate until chilled, about 20 minutes. 3 Stir in the lemon juice, season with salt and pepper and sprinkle with the mint. Serve chilled or at room temperature.
Source: food.com
From the kitchen of One Perfect Bite... I make this dish 10 to 12 times a year, alternating the use of capers with chopped Sicilian olives, depending on the preference of those who will be sitting at the table. Either way, it is a simple dish to prepare and the frequency with which it appears on my table is a clear indication that it's a family favorite. The chicken takes about 30 minutes to cook, but because I've added a brining step, it will take an additional hour of wait time before cooking can actually begin. If you are not held hostage by the clock, the chicken makes a perfect weeknight meal that is fancy enough to serve to guests, as well as to your family, who will sing praises to your name. If you consider brining to be wretched excess, you can, of course, bypass the step, but the downside of that is you'll never know how good this dish can be when the chicken is allowed to absorb the flavors of the brine. Osmosis allows the brining liquid to penetrate the tissue of the cutlets, improving their flavor and texture as the proteins in the muscle structure are broken down by the inward flow of salt water to the tissue. I also use a jaccard to tenderize the breasts prior to dunking them in brine. I can hear some of you thinking, "She thinks I'm made of time," but truth is small steps can make a huge difference in the quality of the dishes we serve to our family and friends. Years ago, I was a fan of Caprial Pence who used the jaccard on chicken she served in her restaurant. If it was good enough for her, it's good enough for me, and I've used the technique for over a decade now and no one complains about tough chicken. You'll notice that I've used instant flour as a possible ingredient in the recipe below. This is another restaurant technique that I use in my own kitchen. The flour can be found in a canister in any large super market and it has become my favorite coating for meat and poultry that needs to be dredged before it is sauteed or fried. Instant flour - the best known brand is Wondra - has the consistency of baby powder, but, like cornstarch, it produces meat and poultry with a lighter and crispier coating than that produced by all-purpose flour. The coating helps prevent toughening of the surfaces exposed to direct heat. Lest you think the use of instant flour is something I've conjured from the miasma, you'll feel better knowing that Jacques Pepin, David Bouley, Eric Ripert and Mario Batalti are also fans of he product. I'd also like to talk about the use of dry vermouth in this and other of my recipes. Overtime, this has become a convenience for me. The Silver Fox and I are not big drinkers. We are not prudes, but we've both reached a point in life where calories count, and we've made a conscious decision to chew rather than sip our calories. That means I rarely have a bottle of white wine in the refrigerator, and vermouth, which has a shelf life of 3 to 6 months, is a simple and obvious substitution for it. Vermouth is a fortified white wine that is mildly flavored with herbs, spices, and fruits. It is a lot less expensive than the dry white wines that are suitable for drinking, and while its flavor is a little different from a straight white table wine, it works wonderfully well when cooking savory dishes. I recommend you find a brand you like and stick with it when you cook. Flavor is not consistent from one brand to another and the balance of herbs and spices can throw off a recipe, so stay with what you know. Cook's Illustrated has recommended the use of Gallo Dry Vermouth. It is not too highly spiced, so its components won't go to war with the ingredients in your dish. It is also cheap! I do hope you'll give this recipe a try. Here is how the cutlets are made. Chicken Cutlets with Onions, Capers and Cream ...from the kitchen of One Perfect Bite Ingredients: Brine 1/4 cup kosher salt 1/4 cup golden brown sugar 1-1/4 teaspoons poultry seasoning 1/2 teaspoon freshly cracked black pepper 4 cups water Chicken 4 (6-oz.) chicken cutlets or thin chicken breasts 1/4 cup instant or all-purpose flour for dredging 1 tablespoon extra virgin olive oil 2 tablespoons butter, divided use 1 large onion, very thinly sliced 1/2 cup dry vermouth or white wine 3/4 cup undiluted condensed chicken broth, divided use 2 tablespoons capers, drained and rinsed (2 tablespoons of chopped Sicilian olives may be substituted) 2 tablespoon heavy cream or half-and-half Garnish: chopped parsley or strips of lemon zest Directions: 1) To make brine: Combine salt and sugar in a large bowl. Add 1 cup hot water and stir until sugar dissolves. Add 3 cups cold water, poultry seasoning and pepper. Whisk to combine. Pour into a resealable zip top bag. Add chicken cutlets and marinate for 1 hour before proceeding with recipe. 2) To prepare chicken cutlets: Remove chicken from bag and pat dry. Dredge cutlets lightly in flour, shaking off any excess. Heat olive oil and 1 tablespoon butter in a large nonstick skillet. Add cutlets and cook over high heat, turning once until browned, about 3 minutes per side. Transfer browned cutlets to a plate. 3) To cook onions: Add reserved 1 tablespoon butter and onions to pan. Cook until onions are just tender and lightly brown. Add vermouth and 1/2 cup condensed chicken broth. Boil until liquid is reduced to 1/4 cup, about 4 minutes. Stir in capers. 4) To complete chicken: Return cutlets to skillet, placing them on top of onions. Reduce heat, cover pan, and simmer for about 5 minutes, turning cutlets once. Transfer to a serving plate and tent with foil while making sauce. 5) To make sauce: Turn heat up to high. Add reserved 1/4 cup condensed chicken broth to skillet and bring to a boil. Add cream and boil until liquid is of sauce consistency. Adjust seasoning if required. Spoon sauce over chops. Sprinkle with parsley or lemon zest strips. Yield: 4 servings Older Posts Chicken Persillade Creamy Chicken Marsala Orange Phoenix Chicken Chicken Cutlets Pojarski .
Source: oneperfectbite.blogspot.com