Login to cooktime24 in order to save your favorite recipes
If you have not registered yet, register now!

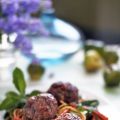
Light and tempting turkey meatballs with fresh herbs, ginger and lime. Okay, I confess. I admit it. When it comes to this recipe? I was totally inspired by Jamie Oliver and his Jamie's Food Revolution . I loved the flash mob stir-fry dance at Marshall University in episode four ( view here at WabiSabi, one of the participants ). The energy, spirit and creativity of the students, the killer combo of cooking and dance, with a generous dash of self expression and celebration got this creaky gluten-free goddess off the couch and movin', Baby. Not to mention, craving a pan-tossed noodle stir-fry. No doubt about it, I've been more attuned to Asian inspired flavors since moving to Santa Monica. Understandable. It's hard not to respond to the fresh, Pacific-infused tastes and heady scents of Asian fusion out here. So when we decided to play around with meatball recipes this weekend, yours truly started conjuring fusion-style tweaks for the humble Mediterranean meatball recipe I know and love. First- I wanted to use organic free-range turkey (come Spring, I favor lighter meatballs and meatloaf , don't you?). And I knew I wanted to use fresh chopped herbs- mint, cilantro and parsley. Perfect with a splash of lime. Some spring onion. A little ginger and chile. Boom. This Asian fusion meatball was born. A quick note on my noodle choice- I've discovered Ancient Harvest Gluten-Free Quinoa Pasta - - and I love the texture and flavor. This is the least starchy gluten-free noodle I've found. And the best part is (perhaps due to the higher protein content of quinoa flour?) it stands up to pan tossing for brilliant stir-fries. Shake up your recipe routine with Asian style noodles and ginger-lime turkey meatballs. Gluten-Free Turkey Meatballs Recipe with Lime, Mint and Ginger on a bed of Asian Style Noodles, Baby Spinach and Fresh Herbs I whipped up an easy Asian stir-fry sauce without soy. But you could easily substitute my molasses and balsamic blend with gluten-free wheat-free tamari sauce . These turkey meatballs are also egg-free. Ingredients: 2 pounds free range organic ground turkey- we use Heidi's Hens® Certified Organic Turkey 1 1/2 cups gluten-free bread crumbs 1 large spring onion or scallion (or 2 small), diced fine 1 medium large carrot, processed or diced very fine 2 cloves fresh garlic, minced 1 teaspoon grated fresh ginger 2 tablespoons fresh chopped parsley 2 tablespoons fresh chopped mint leaves 2 tablespoons fresh chopped cilantro leaves Juice from 1 fresh medium lime 1 tablespoon molasses or wheat-free tamari sauce 1 tablespoon raw agave nectar or real maple syrup Sea salt and ground pepper, to taste (use less salt if you use tamari sauce) Instructions: Preheat the oven to 350ºF. Line a baking sheet with a reusable Exopat or Silpat . Or double up baking sheets and line the upper pan with parchment paper. In a large mixing bowl, break apart and blend the ground organic free-range turkey with the gluten-free bread crumbs, using a sturdy metal spoon . Add in the diced spring onion, processed carrot, minced garlic, grated ginger, and fresh herbs. Mix just until blended. Add in the fresh lime juice, molasses (or wheat-free tamari), agave. Mix lightly. Season with salt and pepper as you go- but don't add too much salt- especially if you use tamari sauce, which is already salty. Form 28 meatballs using the palms of your hands to roll and round spoonfuls of the mixture. They should be roughly the size of a golf ball. Place the turkey meatballs on the lined baking sheet as you roll them. Wash your hands in hot soapy water- you know this, right? Bake the meatballs in the center of a pre-heated oven for about 20 to 30 minutes until no longer pink inside. Place the baking sheet on a cooling rack and brush them with a little olive oil. Serve immediately with Asian style noodles, recipe follows. Recipe Source: glutenfreegoddess.blogspot.com Gluten-free meatballs with Asian style noodles. Quick and Easy Asian Style Noodle Recipe As mentioned, I don't use soy, but a wheat-free tamari sauce would be delicious in this quick stir-fry sauce. Sub the molasses with the gluten-free tamari sauce . Or just add in some gluten-free tamari, to taste. Note: I don't add extra sauce on the meatballs when I serve them like this- but if you prefer your meatballs saucy, make extra stir-fry sauce. Ingredients: 1 package gluten-free noodles or spaghetti Vegetable oil, as needed 2-3 spring onions or scallions, sliced (white and light green sections) 2 cloves garlic, minced 1 fresh diced chile, or hot pepper flakes, to taste 1-2 teaspoons fresh grated ginger- or to taste 3-4 carrots sliced into matchsticks 3 tablespoons molasses or gluten-free Tamari 2 tablespoons balsamic vinegar Sea salt, to taste 1 12-oz. bag of baby spinach leaves 2 tablespoons each of fresh chopped parsley, mint and cilantro Instructions: Bring a pasta pot of water to a rapid boil. Add a dab of vegetable oil. Add the noodles and stir. Cook the quinoa noodles until they are al dente- firm to the bite- not mushy! 4 to 6 minutes. Don't overcook. I mean it. Meanwhile, heat a tablespoon of coconut oil in a large wok style pan or skillet over medium-high heat and add in the spring onions, garlic, chile, ginger, and carrots. Stir-fry until the carrots are tender-crisp. They should be done roughly in 4-5 minutes. Add in the molasses and balsamic vinegar (or if using tamari sauce, use that in place of molasses) and stir to coat. Taste test to see if the carrots need a little salt. Drain the al dente noodles and quickly add them into the wok/skillet mixture, tossing lightly to coat the strands. Add or adjust seasonings to taste. Add in the baby spinach and toss again- just to heat through to barely wilting- not even a minute. Add in half the chopped fresh herbs and toss a bit. Plate the noodles immediately. Add the turkey meatballs. Sprinkle with the remaining fresh herbs. The noodle recipe serves 4, with leftover meatballs. Note: Freeze leftover meatballs for an easy weeknight supper. Recipe Source: glutenfreegoddess.blogspot.com All images & content are copyright protected, all rights reserved. Please do not use our images or content without prior permission. Thank you. More gluten-free meatball recipes from food bloggers: I Am Gluten-Free's secret ingredient Gluten-Free "Meatballs" Gluten-Free Day's lamb based Gluten-Free Meatballs Greek Meatballs with feta at Kalyn's Kitchen Gluten-Free Spaghetti and Marvelous Meatballs at Healthy Eats Sensitive Pantry's Tiny Turkey Meatballs
Source: glutenfreegoddess.blogspot.com
Summer. Time for grilling. This easy as 1, 2, 3 recipe has been a summer family staple since I was a blushing bride, learning to grill fish. We won't talk about how many years ago that was, Dear Reader. I mean, the blushing bridal part. Let's just say my oldest son is 26 and leave it at that. So, you may ask- if you're a blushing bride yourself- how do you grill a slab of fresh fish and veggies all at once and have it turn out so tender and flaky and savory that your newly minted partner for life will turn to you and whisper, I knew I married the right girl? Or boy (I make no assumptions around here, goddess forbid). Well, here's a little secret I learned way back when. Back before cooking blogs and Food TV and Jamie Oliver . I learned it from a woman who liked my paintings. This is the only way to make fish, she told me. Trust me . I trust you, I answered. Now tell me your secret. Foil, she said. And onions, garlic and tomatoes. It's a Mediterranean style fish- not the typical butter and Ritz cracker crumbs you get around here (we were living on Cape Cod at the time). This is the real thing, she continued. Real food. Big flavor. You'll love it! And she was right. Here's my easy version of Mediterranean fish- grilled (or baked) with spinach, tomatoes, onions and garlic. I also added balsamic vinegar and fresh chopped herbs. Easy Mediterranean Fish Recipe in Foil Packets- Serve with Rice The fish I used this time was halibut. But any hefty white fish will do- cod, haddock, tilapia, or orange roughy would all be brilliant. Ingredients: 4 serving size fish fillets, rinsed and patted dry (about 1 1/2 pounds) A squeeze of fresh lemon juice Sea salt and fresh pepper 8 cloves of garlic, roughly chopped 2 red or sweet yellow onions, cut into pieces 4 cups baby spinach leaves- or chopped spinach 8 plum or Italian tomatoes, roughly chopped 4 tablespoons balsamic vinegar 2 tablespoons chopped fresh basil 2 tablespoons chopped fresh parsley or cilantro A sprinkle of red pepper flakes, to taste Extra virgin olive oil, as needed Instructions: Fire up the grill to medium high heat. If you are cooking indoors, preheat the oven to 375ºF. Tear off a large sheet of aluminum foil and place it on a large platter or tray. Lay the fish fillets in the center, in a single layer. Squeeze a little lemon juice over the fillets. Season with sea salt and fresh pepper. In a large mixing bowl, combine the garlic, onion, baby spinach and tomatoes. Add the balsamic vinegar, fresh chopped herbs, red pepper flakes and toss to mix. Drizzle with enough extra virgin olive oil to moisten it all. Season with a little sea salt and pepper. Toss to coat. Tear off a second sheet of foil the same size as the bottom sheet. Turn up all the edges of the bottom sheet a bit to catch any liquid that runs to the edge. Spoon the spinach-tomato mixture on top of the fish. Drizzle on any remaining olive oil left in the bowl. Lay the second piece of foil on top of the fish and veggies and crimp the foil closed all around the edges to make a large packet. Carry the packet with the platter or tray to the grill and carefully transfer the packet to the preheated grill. Cover the grill and cook until the fish is done- about 20 minutes or so- depending on the thickness of the fillet, and how hot your fire is. The fish should flake easily with a fork, and appear opaque. Serve with hot cooked rice. I served mine with my tasty Spanish Brown Rice Bake recipe . Recipe Source: glutenfreegoddess.blogspot.com All images & content are copyright protected, all rights reserved. Please do not use our images or content without prior permission. Thank you. Karina's Note for Gluten-Free Folks: This is a safe way for those with celiac disease or food allergies to eat at pot luck barbecues and picnics. Bring your own packets! Make single individual packets for each person to make it easy to share the grill with no danger of cross contamination. More (Fabulous!) Summer Grill Recipes From Food Bloggers: Kalyn's Kitchen: Grilled Salmon with Asian Dipping Sauce Cooking with Amy's Shrimp and Mango Kebabs Food Blogga's Grilled Watermelon Gluten-Free Bay's Grilled Chipotle Lime Chicken
Source: glutenfreegoddess.blogspot.com
1 lb fresh asparagus 1 (12 ounce) package phyllo pastry sheets , defrosted 1/4 lb butter , melted 1 lb potato 1/4 lb white cheddar cheese , grated 1/4 lb lancashire cheese , grated 1 pinch grated nutmeg (a little less than 1/8 tsp) 1/2 pint heavy cream or 1/2 pint double cream 3 eggs , beaten lightly salt pepper 1 Preheat oven to 375F (190C). Also, set a large pot of salted water to boil. 2 Trim asparagus spears to fit into a rectangular tart pan (with removable bottom). Toss trimmed asparagus into boiling salted water for about 2 minutes to blanch. 3 Boil potatoes for 12 minutes in salted water. Drain. 4 While potatoes are boiling, layer phyllo into tart pan, leaving about 1" of dough overhanging the edge of the pan. Butter each sheet as it goes into the pan. 5 Mash potatoes with Cheddar and Lancashire cheeses. Add salt and pepper to taste. Add nutmeg and cream. Add eggs and mix well. Pour into tart pan. Lay asparagus spears on top, alternating directions of tips. Brush top lightly with any remaining melted butter. Crimp overhanging phyllo up along edge of tart pan. Put pan on the lowest shelf of the oven for 15-20 minutes. Remove pan from oven and allow it to set for at least 15 minutes. 6 Serve with a light salad of fresh spring greens.
Source: food.com
1/2 lb mixed heirloom tomato, various colors 1 teaspoon kosher salt 1 teaspoon dried oregano 1 tablespoon extra virgin olive oil 1 teaspoon red wine vinegar 1/2 small fresh red chili pepper , deseeded and chopped finely (optional) 1/2 garlic clove , grated 1 tablespoon fresh coriander 1/2 lemon, juice of 1 Cut tomatoes roughly into bite sized pieces. Toss into a colander. Sprinkle liberally with kosher salt. Toss well and allow to drain 15 minutes. 2 Transfer to a serving bowl. Add oregano, olive oil, vinegar, chili and garlic; toss well. Marinate 15 minutes. 3 Roughly chop the tomatoes with the coriander. Stir in lemon juice. Serve with fish or chicken.
Source: food.com
1 lb mixed heirloom tomato, various colors 1 tablespoon kosher salt 1/2 tablespoon dried oregano 1 1/2 tablespoons extra virgin olive oil 1/2 tablespoon red wine vinegar 1/2 small fresh red chili pepper , deseeded and chopped finely (optional) 1/2 garlic clove , grated 1/2 lb fresh mozzarella cheese , ciliegine size (cherry size) 1 Cut tomatoes roughly into bite sized pieces. Toss into a colander. Sprinkle liberally with kosher salt. Toss well and allow to drain 15 minutes. 2 Transfer to a serving bowl. Add oregano, olive oil, vinegar, chili and garlic; toss well. Serve with mozzarella.
Source: food.com
4 pork chops, about 1 1/2-inch thick salt black pepper 8 large fresh sage leaves 1 tablespoon olive oil 1/2 lemon, juice of 1 Score the fat at the edge of the chops at 1/2" intervals. Sprinkle both sides of each chop with salt and pepper. Stick a large sage leaf to the meat over the "eye" of the chop; press in firmly. 2 Pour olive oil into a hot non-stick skillet. Add chops, sage side down. Apply the remaining sage leaves to the now upper side of the chops. 3 Place skillet in a preheated 425F (220C) oven for 12-15 minutes, until golden brown, turning once half way through. Remove to a plate. 4 Pour fat out of pan. Deglaze with lemon juice and drizzle over chops.
Source: food.com
5 1/2 kg turkey 2 -4 clementines rosemary , bay or fresh thyme sprig 150 g butter 2 -3 carrots 3 onions , peeled 2 celery ribs 1 For the Butter:. 2 You need to finely chop the carrots, onion and celery. Chop rosemary and thyme. 3 Mix into the butter thoroughly. 4 The Turkey:. 5 Using a tablespoon, gently seperate the skin from the meat through the cavity up towards the breastbone of the bird. 6 Once the skin is separated, take half of the flavoured butter and push in between the skin and the meat. Massage so that the butter is evenly distributed. 7 The other half of the butter is to be smoothed over the outside of the turkey. 8 Using a skewer or rosemary sprigs, secure the cavity, so that the skin doesn't slide. 9 Cover in cling film and keep in the refridgerator until ready to be cooked. 10 Before cooking, chop 2-4 clementines and place in the cavity. 11 Stuff the neck of the bird with as much stuffing as possible. 12 Cook the bird on 350 / Gas Mark 4. Time scale is approx 30 minutes per kilo, plus 20 minutes at the end. 13 For best results, baste the turkey every 45 minutes. 14 Enjoy.
Source: food.com
2 lbs stewing beef , diced 1 onion , chopped 4 garlic cloves , minced 3 stalks celery , chopped 4 ounces button mushrooms , chopped 4 bay leaves 1 teaspoon thyme 1 tablespoon tomato paste 1 (15 ounce) can Guinness stout 3 1/2 cups beef broth 1 1/2 tablespoons flour 1 Pre-heat the oven to 350°F. 2 In a large dutch oven, heat some olive oil over medium heat. Toss the meat cubes with the 1 ½ tbsp of flour, and then in batches, brown them until seared. Remove to plate as you go. 3 Add more oil if you need to, then add the celery, onion, and garlic. Cook and stir until the vegetables are soft. Add the thyme and season with salt and pepper. Stir in the mushrooms, bay leaves, broth, tomato paste, and Guinness; bring to a boil, then cover and put into the oven. 4 Let the stew bubble away in the oven for two hours. Mean while, make the dumplings. 5 In a bowl, stir together flour, baking powder, a pinch of nutmeg, salt, and pepper. Cut in your bits of butter with a pastry cutter, and then stir in the cheese. Add milk, stirring until you get a wet dough. You may need more or less, use your judgment. 6 Spoon out portions of the dough about the size of a ping pong ball, roll them with your hands, and place on a cookie sheet. Put them in the fridge to chill while the stew cooks. 7 When the stew is finished, plop the dumplings in one at a time, pushing them under the juices, and then put a lid back on and allow them to cook for another 30 minutes.
Source: food.com
10 lbs boneless pork butt 4 ounces salt 2 ounces fennel seeds 2 ounces red peppers, crushed casing 1 To prepare casings: Let casings soak in cool water about five minutes to remove salt on outer surface (no longer, or they will become too tender to stuff) and flush salt from the inside by placing one end on faucet nozzle and turn on cold tap water (if you see holes or water leaking, cut and discard). 2 Remove casing from faucet and gently squeeze out water; cover rinsed casings and refrigerate until ready to use. 3 First grind meat coarsely, incorporate seasonings evenly, and re-grind. 4 Fill the casings using the sausage horn attachment and make links by twisting the sausage where you wish the links to be. Four inches is a good size for a regular serving, smaller links may be made for appetizer servings. 5 To cook, place the sausage in large saucepan or dutch oven in a single layer; add a little water or broth, cover and heat. 6 to a low simmer. 7 Maintain a low simmer (sausages may burst if cooked at too high a heat) until the sausage is heated through and cooked thoroughly, approximately 15 minutes. 8 Drain and let rest for about 15 minutes before slicing; serve while still warm.
Source: food.com
500 g plain flour 100 g lard 150 g butter salt 2 large eggs 1 Preheat the oven to 190° Celsius. 2 Rub together the flour and the fat. 3 Add the eggs and bring together carefully. 4 Chill in the refrigator for 1 hour. 5 Once your pastry has chilled roll it out to fit an 11-inch/28-centimeter tin with a removable bottom and bake it blind for 10 minutes. 6 Lower the oven temperatur to 180° Celsius. 7 Mix all the filling ingredients together then pour the filling into the pastry case. 8 Sprinkle over the goat's cheese, lay over the pancetta slices and then finish off with a drizzle of thyme oil. 9 Bake in the oven for 30 minutes.
Source: food.com
8 cups water 1 cup sugar 3 (6 ounce) cans frozen lemonade, thawed 48 ounces can apple juice, chilled 2 (24 ounce) bottles cranberry juice cocktail , chilled 2 cups orange juice, chilled 2 cups strong cold tea ice 1 Combine water and sugar in medium saucepan. Bring to a boil and boil 5 minutes. Cool. 2 Pour sugar syrup, lemonade, apple juice, cranberry juice, orange juice and tea over a block of ice in a punch bowl. Stir to blend. Makes about fifty (4-oz.) servings. Garnish with slices of lemon and orange. 3 Margo Oliver’s Most Treasured Recipes.
Source: food.com
As someone who loves anything related to food, I love reading about it, making and eating it (obviously), but I also find it amazing to talk about it with different people and learn what they like, what they don’t like and how their tastes change with time. I have those conversations with my husband all the time, and he tells me about the food he ate as a kid, things he loved and things he couldn’t stand, how it took him so long to appreciate all sorts of vegetables, and that his mother would be really glad to see him finally eating like an adult (she passed away in 2011). Every time Joao and I talk about those things I feel more inspired to cook, and when he asked me to make meatballs – one of his all time favorite dishes – I remembered Jamie Oliver’s meatballs alla Norma and thought that a bit of eggplant in the meatballs wouldn’t hurt. I love eggplant . :) The eggplant sauce tasted divine with the meatballs; Jamie served his over polenta, but since it was too hot here I went with spaghetti instead and some bread to mop up the sauce – a simple yet delicious meal that I get to replicate anytime I want with the meatballs I stashed in my freezer. Meatballs alla Norma slightly adapted from the always delicious Save with Jamie: Shop Smart, Cook Clever, Waste Less Meatballs – recipe here Sauce: 1 large eggplant olive oil 2 cloves garlic, minced 2 tablespoons sweet chili sauce 2 tablespoons balsamic vinegar 1 400g (14oz) can diced tomatoes salt and freshly ground black pepper handful fresh basil leaves Dice the eggplant into 1.5 cm cubes, then season well with salt and leave for 15 min in a colander. Preheat the oven to 200°C/400°F. Line a large baking sheet with a double layer of foil and brush it with olive oil. Place the meatballs onto the prepared sheet and bake until firm and cooked through (about 30 minutes) – bake as many as you want, the recipe yields about 25 meatballs. You can freeze uncooked meatballs for up to 2 months and bake them directly from frozen. While the meatballs are in the oven, make the sauce: take handfuls of the eggplant and squeeze out the excess salty liquid, then put into a saucepan on a medium heat with a lug of oil to cook for 10 min, or until golden, stirring occasionally. Add the garlic and cook until fragrant. Stir in the sweet chili sauce and balsamic, add the tomatoes and 3 tablespoons water. Season with salt and black pepper, then simmer for 10-15 min, or until thickened. Stir in the basil and remove from the heat. Add the meatballs to the sauce and serve immediately. Serves 4
Source: technicolorkitcheninenglish.blogspot.com
This recipe features: Classic Thai flavors, with a smooth, velvety soup Amp of the intensity of the herbs with a quick sauté of lemongrass, cilantro stems, garlic and ginger Customize soup by adding shrimp or mushroom (canned Asian straw mushrooms work really well)
Southeast Asian cuisine features what I call the 5S’s – salty, sweet, sour, spicy, savory. This classic combination is what makes Thai Chicken Coconut Soup so irresistible – the initial kick of the spicy chile pepper and lime, followed by salty/savory that’s tempered with a touch of sugar. The creamy coconut milk lingers to soothe the spiciness and allows all the distinct flavors to play nicely with each other.
This recipe is from Chef Lorraine Pascale, a #1 bestselling author in the U.K. Her book, Everyday Easy features elegant, fuss-free cooking for weeknight dinners. Lorraine Pascale is the undisputed queen of the kitchen, queen of the simple and the simply delicious.Jamie Oliver
Recipes include: Thai Beef Salad with Roasted Peanuts and Chili Dressing Shrimp Caeser Salad Lozza’s Lamb Biryani Goat Cheese, Toasted Hazelnut Honey Quesadillas with Arugula Salad Crouching Tiger, Hidden Zebra Cake
and many, many more. Each recipe is easy, breezy and complete with a gorgeous color photograph. The Thai Chicken Coconut Soup Recipe is by Lorraine Pascale, photo is also from the cookbook, by Myles New. Yum

Song of the Builders by Mary Oliver On a summer morning I sat down on a hillside to think about God - a worthy pastime. Near me, I saw a single cricket; it was moving the grains of the hillside this way and that way. How great was its energy, how humble its effort. Let us hope it will always be like this, each of us going on in our inexplicable ways building the universe.
After enough pleading Grandma would agree to let me go visit Grandpa in the barn. I didn’t grow up on the farm so visiting the cows was thrilling, until she made me wrap plastic bags around my shoes so I wouldn’t get them dirty. For some reason that was enough to stall my trip out to the barn to visit Grandpa while did his morning milking.
I’ve grown up since then and relished the opportunity to go get my shoes dirty and visit some cows a couple weeks ago. The city horizon faded into rolling hills dotted with barns; some run down and out of use and others, like the ones on the Werkhoven Dairy, filled with milk-producing cows.
While on the farm we learned that cow is queen. Andy Werkhoven along with his son and daughter spend their time managing the comfort and care of their cows. Ultimately every decision they make is for that purpose because if she isn’t happy they are out of a job. “The more comfortable cows are, the more milk they make. There is no drug in the world that will produce more milk if it’s not a healthy or comfortable cow.” And in farm life, where the margins are so slim, every drop counts.
I walked away from our farm tour with my mind reeling. From the great lengths they go to care for their cows; large airy barns with a calculated mix of grains and corn, sand beds for better aeration that get cleaned every time the cows go to the parlor to get milked (three times a day), to the astonishing science behind their digester project where they take the waste from the farm and turn it into something good.
“The anaerobic digester utilizes manure from the cows and co-digests pre-consumer food waste to make energy (enough to produce electricity for as many as 300 homes), thereby keeping the air and water clean, protecting salmon streams, keeping the dairy operating and creating Grade A compost.”
For me, the most poignant part of this trip was to have a deeper appreciation for the cream, thick and pale yellow, I pour into my coffee every morning. For the butter I slather on bread with great abandon and the whole milk that cools our oatmeal or softens our cereal.
The day after our trip I found myself in a familiar spot; the grocery store. Standing in front of the milk case I stood in awe and admiration for what was in front of me. As a mom of three young milk drinking children I so often grumble at the price of a gallon of milk. That day I reached for the gallon produced by a local dairy and appreciated it deeply because I know the care, the cost and the passion that went into it.
Farming is an incredibly difficult job, one that must be fueled by passion because there’s no fame, no accolades, no large paychecks coming to the hands of the farmer who operates a small family dairy but we need them desperately.
I started this post with Song of the Builders by Mary Oliver. It’s been running through my mind over the last few weeks when I call into question the value of my day to day work. Whether it’s putting away the dishes, again, loading yet another load into the laundry, writing up a recipe, or snapping a photo of my lunch. When the “whys?” whisper in my ear I reply, “I’m building the universe.” Because in some way I am. We all are.
These farmers are too. Behind the plastic carton that carries our milk is a family who passionately cares for their cows and puts all of their effort into every drop because they too are building the universe. We rarely think about calf nutrition, corn crops, cooling down the herd in this crazy heat we’ve been having, where the waste goes, but the farmers do.
When Shauna asked the farmers at the end of our day with them; “What’s the one thing you want us to tell everybody?” They responded, “Drink milk and appreciate where it comes from.”
Consuming dairy has never been hard for me. As a granddaughter of a dairy farmer I’ve rarely shied away from cream and butter but now I hold it with higher esteem, appreciating its value and all that happens in order to ensure that my coffee is sufficiently capped, my cookies are crisp with butter and my summer berries have a billowy cream-filled bed to land
This post was sponsored by Washington Dairy. As always, the words, images and recipes are mine.
If you are interested in learning more about the Werkhoven Farm or more on Sustainable Farming check out these great links for more information:
Sustainable Land
Cow Care
Werkhoven Dairy
The Digester Black and Blue Semifreddo with Toasted Oat Crumble
Serves 6 to 8
1/2 cup + 2 tablespoons sugar
2 cups blueberries
2 cups blackberries
zest and juice from 1 lemon
4 eggs
1 cup heavy cream
1 vanilla bean (or 2 teaspoons vanilla extracto)
1/4 teaspoon kosher salt
Lightly spray a loaf pan with pan spray and line it with plastic wrap. Set aside.
In a medium saucepan over medium high heat add 1/2 cup sugar in an even layer. Watch it closely as it melts and caramelizes. Carefully stir the sugar as the edges start to melt. Continue to caramelize until all of the sugar is melted. It should be a deep copper color and will smoke a bit. If some of the sugar starts to get too dark you can remove the pan from the heat, give it a stir and then continue to cook.
Add 1 cup of each of the blueberries and the blackberries. This will make the caramel seize and harden. Reduce the heat to low and cook until all of the caramel has once again melted, about 5 to 7 minutes.
Stir in the remaining berries.
Set this aside to cool.
In the bowl of a mixer whisk the 4 eggs until they lighten. On medium high speed slowly pour in the remaining 2 tablespoons of sugar and continue to whip until very light, frothy and about tripled in volume.
Whip the cream with the vanilla seeds or extract to soft peaks.
Add the slightly cooled berry caramel mixture to the cream and mix using the whisk. Add the adds and mix, again with the whisk, until just combined. Take care not to knock too much of the air out.
Add this to the prepared loaf pan and freeze for 4 hours or until firm.
Crumble
1 cup flour
1/4 cup oats
1/2 tsp kosher salt
1/2 teaspoon cinnamon
3 tablespoons sugar
3/4 stick/ 6 tablespoons cold butter cut into small pieces
Preheat the oven to 350°F and line a baking sheet with parchment paper.
In a medium bowl combine the flour, oats, salt, cinnamon, and sugar, Add the butter and blend until the mixture holds in small clumps when squeezed.
Add the crumble to the baking sheet. Pinch together some of the dough so there are some large pieces in there too.
Bake for 30 minutes or until golden brown.
Serve the semifreddo on a bed of crumble.
Cap with whipped cream if you’d like.

I found Crumbliest Scones when a member of the Facebook baking group asked me for a recipe. To be honest, I’ve never heard of this name before so I did a Google search and found that this recipe was actually created by Jamie Oliver. I followed the recipe to a T (with some minor changes) as it is easy and straightforward. I love the end result especially when the scones come out of the oven. They are light and crumbly with a hint of orange fragrance as I had grated some orange zest into the flour before mixing it into a dough. The scones are best served with clotted cream and jam with English tea.
3.7 from 3 reviews Crumbliest Scones Save Print Prep time 15 mins Cook time 15 mins Total time 30 mins Author: Ann Low Serves: 8 scones Ingredients 60g dried cranberries, (can use other dried fruit - apricots, blueberries or raisins) orange juice for soaking 75g cold butter 250g selif-raising flour (I used 250g plain flour + 3.5 tsp baking powder) - sifted 1 tsp baking powder 1 heaped teaspoon raw sugar (15g) or caster sugar tsp salt orange zest from 1 orange 1 large egg 2 tbsp milk 1 beaten egg for brushing Instructions Put the dried fruit into a bowl and pour over just enough orange juice to cover and set aside for 2 hours. Preheat the oven to 200 deg C. Drain your soaked fruit (I used dried cranberries and cut into small pieces) Put butter, flour, baking powder, sugar, orange zest and tsp salt into a mixing bowl and rub the butter and flour mixture together till crumbly. Add in egg and milk, and stir it up with a spatula. Add cranberries to the mixture. Move it around a little as possible to get it looking like a scruffy mass, do not over mix. (you can use hand to knead the dough lightly) Sprinkle over some flour, cover the bowl with cling film and pop it into the fridge for 15 minutes. Roll the dough out on a lightly floured surface until it's about 2-3 cm thick. With a 6cm round cutter, cut out circles. Brush the top of each scone with beaten egg and bake in the oven for 12-15 minutes, or until golden.
recipe adapted from here 3.5.3208
酥松司康饼
材料: 55克 蔓越莓干 (或其他干果 -杏铺,蓝莓,葡萄都可以) 鲜榨橙汁 75克 冷牛油 250克 自发面粉 (我用250克普通面粉+3.5茶匙发粉)- 过筛 1茶匙 发粉 15克 原蔗金砂糖 (细砂糖也可以) 1/4 茶匙 盐 1粒 香橙皮屑 1个 大鸡蛋 2汤匙 牛奶 1 个全鸡蛋,打撒刷表面
做法: 将蔓越莓放入小碗中,加入橙汁至盖过蔓越莓浸泡1-2小时。 预热烤箱至摄氏200度。沥干蔓越莓切小,备用。 将面粉,发粉,糖,香橙皮屑,盐及牛油放入碗中,用手将料类搓成沙粒状态。 加入鸡蛋和牛奶,用刮刀把料混合在一起即可。加入浸泡好的蔓越莓干再混合均匀至成面团。 (可以用手搓匀但不要过度的揉捏,这样烤出来的司康饼才会松)。 然后撒上少许面粉,用保鲜纸盖住,放入冰箱冷藏15分钟。 在桌面上撒上些面粉,放上面团,再撒上面粉,盖上一张朔胶纸,用擀棍轻轻擀成至2-3cm厚的面片。用直径6cm的圆形摸切出圆面片,放在烤盘上底部铺纸,在表面刷一层蛋液。放进预热烤箱,烤约12-15分钟至表面金黄色即可。 司康饼非常适合抹上奶酪或果酱。趁热的时候吃又香又很松。最适合搭配一杯红茶享受一下的英式小点心。
***************
The post Crumbliest Scones 酥松司康饼 appeared first on Anncoo Journal.
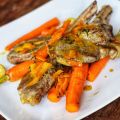
In the midst of this crisis I’ve been making extra effort to support our local stores. These days, I do most of my produce shopping at smaller shops instead of the supermarket. Far more often than I used to, I go to Turkish shops - which have surprisingly good produce and delicious, much more affordable lamb than I can find at the supermarket. And so I came home with lamb chops - again. The next challenge was to find a recipe. I’d made this one once before, but all my pictures failed. So to share it with you, I had to try again. Not that that was something to be sorry about... :) Ingredients: 6 lamb chops (about 600g in total), french trimmed 200g mixed colour baby carrots (out of season here, so I stuck with orange) 3 oranges 8 cloves garlic, unpeeled 15g thyme (about half a bunch salt and freshly ground black pepper olive oil Instructions: 1. Score the fat of the lamb chops, and season them with salt and pepper. Then line them up like a rack, so that the fat is stuck together. 2. Stand them upright in a large skillet with some olive oil, fat side bottom up, and heat for 4-5 minutes until the fat is crispy. 3. In the meantime, trim the carrots. If they are large, cut them in half. Together with the unpeeled garlic, add them to the pan, turning frequently. 4. Turn the lamb chops and fry for 2 minutes on each side, until they are lightly browned but the insides are still pink. 5. Meanwhile take a vegetable grater and slice the rind off the orange quickly, adding it to the pan together with the thyme. Sauté for 30 seconds, to let the flavours mix, then remove the lamb chops from the pan and set aside. 6. Juice the oranges and add the juice to the pan. Continue heating until most of the orange juice is evaporated and you are left with a stick mixture. 7. Briefly return the lamb chops to the pan to heat with the rest and mix with the sauce, then serve.
Source: ilses.kitchen

