Login to cooktime24 in order to save your favorite recipes
If you have not registered yet, register now!
Tweet #pin-wrapper > a {background-image:none !important;} Photo Courtesy of Culinary Trends and Bouchon Photo One Perfect Bite From the kitchen of One Perfect Bite... I'm not given to hero worship and will never understand the commotion that surrounds some icons in the cooking world. I have respect for the very best of them and an amused tolerance for the "wannabes". Sure, I have a favorite chef or two, but my admiration never approaches adulation. It's muted and controlled, and based on an honest assessment of their food that, I hope, is detached from the cult of personality that's so prevalent today. I've obviously had some disappointments and tend to be unforgiving when that happens. This is not, however, going to be an expose. I want, instead, to focus on a chef who consistently delivers - in his food, his restaurants and his books. Many of you know of my admiration for Thomas Keller. I have featured several of his recipes on One Perfect Bite, have read all of his books and eat in his restaurants whenever possible. I have not, until today, baked any of the cookies that are sold at his Bouchon Bakery. I chose the Nutter Butter cookies because I knew the Silver Fox would love them. I decide to use the recipe from the New York Times . After I had finished my baking, I found a more exact recipe for them on Culinary Trends. I plan to use that recipe, found here , the next time I make these cookies. The recipe below comes from the New York Times, but I've changed the ingredient's list to make only half a batch of the cookies. While they are quite homely in appearance, they are surprisingly light and crisp and very, very good. My only criticism is that the cookies are way too large for mere mortals to consume. Mine were saucer-size and next time I'll make them smaller. If you bake and you love cookies, you'll really enjoy these. If you are a serious baker, I urge you to visit Culinary Trends . Here's the New York Times recipe scaled to make half a batch of cookies. Nutter Butter Cookies ...from the kitchen of One Perfect Bite, courtesy of the New York Times and Bouchon Bakery Ingredients: Cookie Dough: 1 cup all-purpose flour 1 teaspoon baking powder 2 teaspoons baking soda 1/2 pound (2 sticks) butter, at room temperature 1/3 cup creamy peanut butter, preferably Skippy 1/2 cup granulated sugar 1/2 cup firmly packed light brown sugar 1 large egg 3/4 teaspoons vanilla extract 3 tablespoons coarsely chopped peanuts (omitted and used crunchy peanut butter) 1-1/4 cups quick-cooking oats Cookie Filling: 4 tablespoons butter, at room temperature 1/4 cup creamy peanut butter, preferably Skippy 3/4 cups confectioners’ sugar Directions: 1) Preheat oven to 350 degrees F. 2) To make cookie dough: In a bowl, mix together flour, baking powder and baking soda; set aside. Using an electric mixer, cream together butter and peanut butter. Add sugars and beat at medium speed for 3-4 minutes, scraping down bowl twice. At low speed, add egg and vanilla. Add flour mixture and stir until well mixed, frequently scraping down bowl. Add peanuts (if using) and oats, and mix well. Using an ice cream scoop 2 inches in diameter or an extremely heaping tablespoon, place balls of dough on parchment-lined baking sheets at least three inches apart. Bake until cookies have spread and turned very light golden brown, about 10-14 minutes. Remove from oven and set aside to cool and firm up, 5 to 10 minutes. Transfer to a rack to cool completely before filling. 3) To make filling: Using an electric mixer, cream together butter, peanut butter and confectioners’ sugar until very smooth. 4) To assemble cookies: Spread a thin layer (about 1/8 inch) on underside of a cookie. Sandwich with another cookie. Repeat. Yield: 12 large cookies. Cook's Note: A specific peanut butter is listed in the ingredient list, both here and at Culinary Trends. Interestingly, not all peanut butters taste the same. Apparently the staff at Bouchon prefers Skippy. It is not an advertisement. You might also like these recipes: Nutter Butter Cookies - Look I Made That Chewy No-Bake Nutter Butter Bars - Picky Palate Homemade Nutter Butters - Erin Cooks A Tour of the Bouchon Bakery, Yountville, CA - Baking Bites Thomas Keller's Ad Hoc Brownies - Lawyer Loves Lunch Thomas Keller Oreos - Dishing Up Delights Pink Grapefruit Cake - Playing House Pineapple Upside Down Cake - Seasalt with Food Thomas Keller Chocolate Chip Cookie Recipe - Cookie Madness Thomas Keller Chocolate Chip Cookies - Une Gamine Dans La Cuisine Thomas Keller Chocolate Chunk Cookies - Culinary Idea Lab Thomas Keller's Gingerbread Cookies - Eat Me Daily Thomas Keller's Black Walnut Snow Cookies - Delish Thomas Keller's Sugar Cookies - Tokyo Terrace Shortbread Cookies - Minneapolis Hunter
Source: oneperfectbite.blogspot.com
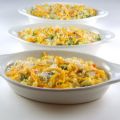
From the kitchen of One Perfect Bite... While I'm not usually a contrarian, I decided to make muffins for a Christmas bake sale this week. I was working on the theory that there would be cookies galore and it might be nice to have something less seasonal to sell. I also wanted to test a recipe developed by a chef I truly admire and the sale was a perfect opportunity to do that. I've had Thomas Keller's new book Bouchon Bakery on reserve at the library for a while now and my name finally reached the top of the list. I spent a wonderful evening paging through the book and knew I'd be making these muffins the first chance I got. The bake sale gave me that opportunity. I love recipes like the one I'm featuring tonight. When a recipe calls for 1 cup + 1 tablespoon + 1 teaspoon of flour, you know you're in the company of genius or dealing with a chef with a borderline obsessive-compulsive disorder. Rest assured, Mr. Keller is a genius. He really wants us to measure ingredients by weight rather than volume, but he's a realist and understands that not everyone has scales, so he uses precise volume measures for equivalency. While pumpkin is an ingredient that we most associate with Thanksgiving, it is available year-round and there is no reason we can't bake with it more often. The Bouchon version of these muffins is baked in Texas-size muffin cups and the frosting is actually piped into, rather than spread over the muffins. That wouldn't work for the bake sale, so I made a couple of small changes to the recipe. I used standard rather than Texas-size muffin cups and that cut baking time in half. I also decided to frost the muffins rather than fill them and that gave me flavor without fuss. I really enjoyed these and I will make them again. They are nicely spiced and the cream cheese icing has a near perfect ratio of cheese to sugar. I hope you will give them a try. Here's the recipe. Pumpkin Muffins ...from the kitchen of One Perfect Bite inspired by Thomas Keller Ingredients: Batter 1-1/4 cups + 3 tablespoons all-purpose flour 1/2 teaspoon baking soda 3/4 + 1/8 teaspoon ground cinnamon 1/4 teaspoon ground cloves 1/2 teaspoon freshly ground nutmeg 1/2 teaspoon kosher salt 1 cup + 2 tablespoons granulated sugar 1/4 cup + 3 tablespoons canola oil 3/4 cup + 2 tablespoons pure canned pumpkin puree or fresh pumpkin puree 2 large eggs 1/2 cup + 1/2 tablespoon golden raisins Cream Cheese Frosting 8 ounces cream cheese, at room temperature 2/3 cup confectioners’ sugar 1/4 vanilla bean, split lengthwise Directions: 1)Place flour in a medium bowl. Sift in baking soda, cinnamon, cloves, nutmeg and allspice. Add salt and whisk to combine. 2) Combine sugar and oil in bowl of a stand mixer fitted with whisk attachment and mix on low speed for about 1 minute. Add pumpkin, increase speed to medium-low, and mix for about 1 minute, until smooth. Reduce speed to low and add eggs in two additions, mixing for about 15 seconds after each, or until just combined. 3) Add dry ingredients in two additions, mixing on low speed for about 15 seconds after each, or until just combined. Remove bowl from mixer stand and scrape bottom of bowl to incorporate any dry ingredients that may have settled there. Fold in raisins, if using. Transfer batter to a covered container and refrigerate overnight, or for up to 36 hours. 4) When ready to proceed, preheat oven to 425 degrees F. Line a 12-cup standard muffin pan with paper liners and spray the papers with non-stick cooking spray. It is important to spray paper liners. 5) Spoon batter into lined muffin cups, filling each 2/3 full. 6) Put pan in oven, lower oven temperature to 325 degrees F., and bake for 25 to 28 minutes, or until muffins are golden brown and a skewer inserted in center comes out clean. Set pan on a cooling rack and cool completely. 7) Meanwhile, place cream cheese in bowl of a stand mixer fitted with paddle attachment and mix on low speed until smooth, about 2 minutes. Scrape down sides and bottom of bowl, add sugar, and pulse on lowest speed to combine. Scrape seeds from vanilla bean, add them to mixture, and mix for 2 to 3 minutes, until completely smooth. Frosting can be used at this point or refrigerated for up to 3 days. If it has been refrigerated, let it sit at room temperature until just cool to the touch, then transfer to a mixer fitted with paddle attachment and beat until smooth. 8) When muffins are at room temperature, frost each of them with cream cheese icing and refrigerate briefly to set. Serve at room temperature. Yield: 12 muffins. One Year Ago Today: Anne-Sophie Pic's Homemade Chicken Nuggets Two Years Ago Today: Tomatillo Chicken and Rice - Crock Pot Cooking Three Years Ago Today: Rosettes - One of My Favorite Christmas Cookies
Source: oneperfectbite.blogspot.com
From the kitchen of One Perfect Bite... I bought lamb chops for our holiday dinner, but because I was unsure of the number I'd be feeding, I ended up with more chops than guests at the table. I decided to grill the remainder of the chops tonight. Those we had for the holiday were delicious and I wanted to serve these with something that would compliment, rather than overpower, their marvelous flavor. I decided to make an endive and watercress salad and a very cheesy orzo pilaf. I can attribute the salad to Thomas Keller, but identifying the parentage of the orzo is next to impossible. Rachael Ray did a version of this recipe at least five years ago and since that time it has appeared in various guises on numerous cooking sites. I lack the wisdom of Solomon and have no easy test to establish paternity, so I'm just going to move along and pretend the orzo is a new version of rice pilaf. It is very easy to do and can be on the table in 15 minutes. Chances are you have all the ingredients you need to make this in your pantry, and, if not, they can all be found in any large grocery store. It is a perfect dish to serve with grilled meat or poultry and I know you'll enjoy it. Here's the recipe. Cheesy Orzo Pilaf ...from the kitchen of One Perfect Bite Ingredients: 3 cups low-sodium chicken broth 3/4 pound orzo 5 minced garlic cloves 1 cup grated Parmesan-Reggiano cheese 2 tablespoons finely minced parsley salt to taste freshly ground pepper to taste Directions: 1) Bring broth to a boil in a large heavy saucepan. Add orzo and garlic and reduce heat to medium high. Simmer, uncovered, for about 7-8 minutes, stirring occasionally, until the pasta is tender, and broth is nearly absorbed. 2) Turn heat off, but leave the pan on stove. Add cheese and parsley and mix well. Season to taste with salt and pepper. Serve warm. Yield: 6 servings. You might also enjoy these recipes: Yangzhou Fried Rice - One Perfect Bite Warm Asian-Style Rice Salad - One Perfect Bite Sticky Rice - One Perfect Bite
Source: oneperfectbite.blogspot.com
I need a secretary! I almost missed the deadline for the October Recipes to Rival Challenge . Fortunately, Sara, who selected this months recipe and blogs at imafoodblog , had selected a Thomas Keller recipe for French Onion Soup that, while time consuming, used readily available ingredients, that made participation possible despite a late start. Our standard for French Onion Soup was set 50 years ago at a restaurant in the Cattlemen's Hotel in Kamloops, British Columbia. The town was a terminus for cattle drives and functioned as a stockyards for holding cattle before slaughter. We came into Kamloops after weeks of hiking in the high country and didn't expect much save a bed and warm bath. You didn't have to venture far from the center of town to encounter unpaved streets and sidewalks. We were really surprised at the quality and quantity of food that was served to us. The food was wonderful and the onion soup that was available with all meals was incredible. The stock used to make the soup was packed with beefy goodness. Without a doubt it was the best onion soup I have ever had. To this day, Bob sings "O, Canada" whenever we have onion soup. He is not shy, so this has been known to happen in restaurants as well as at our table. I'm sure that Thomas Keller would be surprised to learn he was bested by a line cook in a cowtown. Kamloops, by the way, is no longer a provincial hamlet and I can guarantee you the streets are now paved. The town wants to host the Olympic games and they have a really good chance of that happening. Kamloops we love you. The Keller recipe for onion soup is terrific. It's just not up to the Kamloops standard. I followed this recipe as it was written. I made the stock for the soup and was able to purchase the cheeses he recommended. If you haven't yet found a recipe for onion soup that you call your own, this could be a contender. I'm including the Keller recipe for you to scan. While it's long, it is not hard and if you make stock the day before you plan to serve the soup, it will be nearly effortless. You could also use canned broth but be sure to select a low-sodium variety. Keller actually recommends that you use only water if you don't make your own stock. Onion Soup - Soupe A L'Oignon Ingredients for Soup: Sachet: 2 bay leaves 12 black peppercorns 6 large sprigs of thyme Soup: 8 pounds (about 8 large) yellow onions 8 tablespoons (4 ounces) unsalted butter Kosher salt 1 1/2 teaspoons all purpose flour 3 1/2 quarts Beef Stock (recipe below) Freshly ground black pepper Sherry wine vinegar Croutons: 1 baguette (about 2 1/2 inches in diameter) Extra Virgin Olive Oil Kosher salt 6 to 12 slices (1/8 inch thick) aged Comte or Emmentaler cheese (at least 4 inches square) 1 1/2 cups grated aged Comte or Emmentaler cheeses, or a combination of the two. The more basic the soup, the more critical the details: Slice the onions uniformly and brown them very slowly and evenly; slice the bread a half inch thick and dry it completely in the oven; and serve the soup in appropriately sized bowls so that the melted cheese extends over the rim. When you hit it right, there's nothing more satisfying to cook or to eat than this soup. It's worth reiterating the importance of cooking the onions slowly so that the natural sugars caramelize rather than brown through high heating sautéing. The onions cook for about five hours and need to be stirred often, but they can be made up to two days ahead. The soup is best if refrigerated for a day or two so that the flavors of the onion and beef broth can deepen. Comte is traditionally the cheese of choice, but Emmentaler works as well. Gruyère is a bit strong. Use an aged cheese; a younger cheese would just melt and wouldn't form a crust. FOR THE SACHET: Cut a piece of cheesecloth about 7 inches square. Place the bay leaves, peppercorns, and thyme in the center, bring up the edges, and tie with kitchen twine to form a sachet. FOR THE SOUP: Cut off the tops and bottoms of the onions, then cut the onions lengthwise in half. Remove the peels and tough outer layers. Cut a V wedge in each one to remove the core and pull out any solid, flat pieces of onion running up from the core. Lay an onion half cut side down on a cutting board with the root end toward you. Note that there are lines on the outside of the onion. Cutting on the lines (with the grain) rather than against them will help the onions soften. Holding the knife on an angle, almost parallel to the board, cut the onion lengthwise into 1/4 inch thick slices. Once you've cut past the center of the onion, the knife angle will become awkward: Flip the onion onto its side, toward the knife, and finish slicing it, again along the grain. Separate the slices of onion, trimming away any root sections that are still attached and holding the slices together. Repeat with the remaining onions. (You should have about 7 quarts of onions) Melt the butter in a large heavy stockpot over medium heat. Add the onions and 1 tablespoon salt, reduce the heat to low. Cook, stirring every 15 minutes and regulating the heat to keep the mixture bubbling gently, for about 1 hour, or until the onions have wilted and released a lot of liquid. At this point, you can turn up the heat slightly to reduce the liquid, but it is important to continue to cook the onions slowly to develop maximum flavor and keep them from scorching. Continue to stir the onions every 15 minutes, being sure to scrape the bottom and get in the corners of the pot, for about 4 hours more, or until the onions are caramelized throughout and a rich deep brown. (my note - like a super deep brown, like way browner than you think they need to be. Think poop. Yes I said it.) Keep a closer eye on the onions toward the end of the cooking when the liquid has evaporated. Remove from the heat. (You will need 1 1/2 cups of onions for the soup; reserve any extra for another use. The onions can be made up to 2 days ahead and refrigerated.) Transfer the caramelized onions to a 5 quart pot (if they've been refrigerated, reheat until hot.) Sift in the flour and cook over medium-high heat, stirring, for 2 to 3 minutes. Add the beef stock and sachet, bring to a simmer, and simmer for about 1 hour, or until the liquid is reduced to 2 1/2 quarts. Season to taste with salt, pepper, and a few drops of vinegar. Remove from the heat. FOR THE CROUTONS: Preheat the broiler. Cut twelve 3/8 inch thick slices from the baguette (reserve the remainder for another use) and place on a baking sheet. Brush the bread lightly on both sides with olive oil and sprinkle lightly with salt. Place under the broiler and toast the first side until golden brown, then turn and brown the second side. Set aside and leave the broiler on. TO COMPLETE: Return the soup to a simmer. Place six flameproof soup tureens, with about 1 1/2 cups capacity on a baking sheet to catch any spills (the soup will bubble up and over the tureens). Add the hot soup to the tureens, filling them within 1/2 inch of the tops. Top each serving with 2 croutons: Lay them on the surface - do not push them into the soup. Lay the slices of cheese over the croutons so that the cheese overlaps the edges of the tureens by about 1/2 inch, Scatter the grated cheese over the sliced cheese, filling in any areas where the sliced cheese is thiner, or it may melt into the soup rather than forming a crust. Place the tureens under the broiler for a few minutes, until the cheese bubbles, browns, and forms a thick crust. Eat carefully, the soup and tureens will be very hot. Okay now if you are feeling like a real challenge, you can make Keller's homemade beef stock as well. I have never made homemade beef stock before, and I think I may try this when I make the soup again, depending on how much time I have. If anyone has their own recipe for beef stock, use that by all means, and please share! Ingredients for Beef Stock: makes 3 1/2 quarts We use this stock for onion soup and to add in combination with veal stock to beef stews. The bones are roasted first to give the stock a roasted flavor, then simmered with caramelized vegetables for a rich brown stock. About 2 tablespoons canola oil 5 pounds meaty beef necks or leg bones, cut into 2-3 inch sections 2 small Spanish onions (about 8 ounces total), peeled 1/2 teaspoon Kosher salt 3 ounces (1 large) carrot, peeled and cut into 4 pieces 3 ounces (1 large) leek, roots trimmed, split lengthwise, rinsed well, and cut into 2 inch pieces, or leek tops 1 large sprig of thyme 1 large sprig of Italian parsley 3 bay leaves 1/4 teaspoons black peppercorns 1 head garlic, cut horizontally in half (reserve half for another use) Preheat the oven to 475F. Place a large roasting pan in the oven to preheat for about 10 minutes. Add 1 tablespoon of the oil tot he hot roasting pan and distribute the beef bones in a single layer. Roast the bones for about 45 minutes, or until richly browned, turning each piece only after it is well browned on the bottom side. Meanwhile, cut 1 onion crosswise in half. Heat a small heavy skillet over medium-high heat for 2-3 minutes. Place 1 onion half cut side down to one side of the skillet so that it is not over direct heat and let it brown and char black, about 30 minutes. This will add color to the stock, set aside. Remove the roasting pan of bones from the oven and reduce the oven temperature to 400F. Transfer bones to a large colander set over a baking sheet to drain. Drain the fat from the roasting pan and discard. Add about 1 cup water to the pan, place over medium heat, and use a metal spatula to scrape the bottom of the pan and release the pan juices. Let them simmer until reduced by half. Add the resulting fond to a large deep stockpot. Transfer the bones to the stockpot and add about 5 quarts cold water - just enough to cover the bones. Any fat present in the juices will rose to the top when the cold water is added; use a skimmer to remove and discard the fat. Add the charred onion half and the salt. Place over medium heat and bring to a simmer, skimming as impurities rise to the top of the stockpot. Reduce the heat and simmer gently, skimming often, for 5 hours. If the level of liquid falls below the bones, add additional water. Meanwhile, cut the remaining whole onion into quarters and cut the remaining onion half in half again. Place the onions, carrots, and leeks in a roasting pan that will hold them in a single layer, toss with the remaining 1 tablespoon canola oil, and place in the oven to roast for 20 minutes. Remove from the oven and stir, then roast for an additional 20 minutes or until the vegetables are richly caramelized. Set aside. After the stock has simmered for 5 hours, add the caramelized vegetables, herbs, peppercorns, and garlic and simmer for 1 hour longer. Turn off the heat and allow the stock to rest for 10 minutes. Prepare an ice bath. Place a strainer over a large bowl. Removing the bones or pouring out the liquid through the bones would cloud the stock. Instead, carefully ladle the stock out of the pot and pass it through the strainer, tilting the pot as necessary to get all the stock. Strain a second time through a chinois or fine mesh strainer lines with a dampened cheese cloth. Measure the stock. If you have more than 3 1/2 quarts, pour it into a saucepan and reduce to 3 1/2 quarts. Strain the stock into a container and cool in the ice bath, stirring occasionally. (Store the stock in the refrigerator for up to 3 days, or freeze in several containers for longer storage.) NOTE: If the stock will be refrigerated for longer than 3 days, bring it back to a boil after 3 days, cool it, and return it to the refrigerator.
Source: oneperfectbite.blogspot.com
Given the number of scone recipes on this blog, you might be fooled into thinking I'm a huge fan. Not true. Don't get me wrong, I like scones, but if you put out a spread of breakfast pastries before me, scones probably wouldn't be a top three selection. That is, unless these cinnamon honey scones were somewhere on that table. I try to refrain from the hyperbole of labeling recipes the "best ever" but sometimes it just can't be helped and such is the case with these scones. Hands down my favorite scones of all time, no doubt about it! The recipe comes from Thomas Keller's Bouchon Bakery , and though I've had the book since Christmas and even flipped through it a few times, I'd never noticed these scones. Luckily Josie put them on my radar a few months ago and I resolved to make them asap. So, what makes these scones so awesome? Butter, and lots of it, of course :) A cinnamon honey butter is made and then cut into tiny cubes which are incorporated into the dough like any other mix-in (think chocolate chips). It's a genius idea, I want to add tiny butter cubes as mix-ins in all my recipes going forward! They give the scones so much flavor, as well as a really neat marbled appearance. Texturally, the scones are impossibly light and tender, thanks to the inclusion of cake flour in the recipe. And in case they weren't already rich enough on their own, the scones are brushed with a honey butter glaze when they emerge from the oven. They're an occasional indulgence for sure, but worth every single calorie! These cinnamon honey scones would be a perfect weekend project. Though they're easy to make, there are quite a few steps and several require hours of chill time. But once they're assembled you can leave them in the freezer for up to a month, allowing you to pull out and bake a few scones at a time as needed. That's my kind of weekend breakfast! One quick note: this recipe calls for creme fraiche, an ingredient I rarely buy or use but I do recommend splurging for it here. That said, I know there's nothing worse than a half-empty container of creme fraiche sitting in the back of your fridge, so I found another recipe to help you use it up. I'll be sharing it with you next week! Cinnamon Honey Scones just barely adapted from Bouchon Bakery by Thomas Keller and Sebastien Rouxel (originally seen on Pink Parsley ) {Note: The recipes in this book are given in both weight and volume measurements. I made the scones using the weight measurements and would urge you to do the same for the best results.} Cinnamon Honey Cubes 30 g (3 tablespoons) all-purpose flour 30 g (2 1/2 tablespoons) sugar 4 g (1 1/2 teaspoons) ground cinnamon 30 g (about 2 tablespoons) cold unsalted butter, cut into 1/4-inch pieces 20 g (1 tablespoon) honey Scones 152 g (1 cup + 1 1/2 tablespoons) all-purpose flour 304 g (2 1/4 cup + 2 tablespoons) cake flour 12.5 g (2 1/2 teaspoons) baking powder 2.5 g (1/2 teaspoons) baking soda 91 g (1/4 cup + 3 1/2 tablespoons) sugar 227 g (2 sticks) cold unsalted butter, cut into 1/4-inch pieces 135 g (1/2 cup + 1 1/2 tablespoons) heavy cream 135 g (1/2 cup + 2 tablespoons) creme fraiche Honey Butter Glaze 2 oz (4 tablespoons) unsalted butter, melted 20 g (1 tablespoon) honey To make the cinnamon honey cubes: Add the flour, sugar, and cinnamon to a medium bowl and whisk to combine. Add the butter and toss until the pieces are coated in the dry ingredients. Use a pastry cutter to cut the butter into the dry ingredients until no large visible pieces of butter remain. Stir in the honey with a rubber spatula until the mixture forms a smooth paste. Turn the paste out onto a piece of plastic wrap and shape into a 4-inch square. Wrap the mixture and freeze for at least 2 hours (or up to 1 week). To make the scones: Sift both flours, the baking powder, baking soda, and sugar into the bowl of a stand mixer fitted with the paddle attachment. Mix on low speed briefly, just until combined. Add the butter pieces, and mix on low speed until no large visible pieces remain, about 3 minutes. With the mixer on low, gradually pour in the heavy cream, then add the creme fraiche, and continue mixing for about 30 seconds, or until the dry ingredients are evenly moistened. A rough dough should form around the paddle. Remove the cinnamon honey butter from the freezer and cut into 1/4-inch pieces. Add them to the bowl with the dough and use a spoon to incorporate them by hand (it's fine if they start to break up a bit). Turn the dough onto a large piece of plastic wrap and press it together to form a cohesive mass. Place a second piece of plastic wrap on top, and shape the dough into a 7 1/2 by 10-inch rectangle, smoothing the top and sides the best you can (if the dough becomes soft and difficult to work with, just pop it in the fridge for a few minutes). Wrap the dough in the plastic wrap, and refrigerate for about 2 hours, or until firm. Line a baking sheet with parchment paper. Remove the dough from the refrigerator and using a sharp knife, cut it lengthwise into thirds and crosswise into quarters so you end up with 12 equally sized scones. Transfer them to the prepared baking sheet, leaving 1/2 to 1-inch of space between them. Cover the baking sheet with plastic wrap and freeze the scones until they are frozen solid - at least 2 hours, but even better if you can leave them in there overnight (the scones can be frozen for up to 1 month at this point). Preheat oven to 350 F. Line a baking sheet with parchment paper. Transfer the scones you want to bake from the freezer to the prepared baking sheet, leaving about 1 inch of space between them. Bake for about 28-30 minutes, or until the scones are golden brown and slightly firm. Meanwhile, make the glaze by whisking the butter and honey together until combined. When you remove the scones from the oven, immediately brush the tops with the glaze. The scones are best the day you make them, but can be stored in an airtight container at room temperature for 1 day. Makes 12 large scones
Source: traceysculinaryadventures.blogspot.com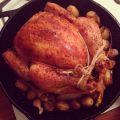
Here was the deal: my favorite roast chicken recipe is this one from Thomas Keller. (Sidebar: I’m currently in San Francisco and last night I ate at Zuni, and as I was leaving the bathroom who did I lock eyes with? Thomas Keller. Turns out he goes to the bathroom too; food gods are just like us!) The problem, though, is that the Thomas Keller roast chicken with root vegetables is an event. It requires that you use your roasting pan; it involves a shopping-cart full of turnips, rutabaga, carrots, onions, and potatoes. It’s not really practical for a weeknight. As for my usual weeknight roast chicken, I’d normally wind up putting the chicken in my All-Clad metal skillet so that I could make a sauce in there afterwards (see here), roasting the vegetables separately. That was OK. Then I remembered my trusty friend the cast iron skillet. What if I did the Keller thing in there? What happened next will astound you (how’s that for an UpWorthy paragraph ender?). It was awesome; a new favorite weeknight dinner. You get all of the caramelized, chicken-fatty vegetables you get in the roasting pan version with so much less to clean up. Plus it’s a perfect amount for two. Oh and the cast iron skillet retains its heat so the chicken gets nice and brown. I bought a container of mini Yukon Gold potatoes and I put that in the cast iron skillet along with a few miniature carrots that came in my CSA, plus an onion cut into quarters and a few garlic cloves still in their skin, tossing everything with a little vegetable oil, salt, and pepper. Then I took a 4 pound chicken, patted it dry, rubbed it with vegetable oil, put salt and pepper over everything (and in the cavity), stuffed it with a head of garlic and some rosemary, and then trussed it in that easy method where you wrap the butcher’s twine around the back end of the breast (where the wings are) and then tie the legs together. See? At this point, I remembered what makes Keller’s chicken so exemplary: butter on the breast. (Once Ludo Lefebvre posted a roast chicken he was making at home on Instagram and the whole thing was caked in butter). So I took some softened butter and did the same thing: Butter makes all the difference. Start that at 475, then after 20 minutes lower to 425 and cook for another hour or so until a thermometer placed between the leg and thigh reads 165. Your whole house will smell like the most comforting place on earth; and then you can eat that comfort. Lift the chicken out of the pan and let it rest on a plate for 10 minutes or so. Meanwhile, check out those vegetables: You may have to pour out some of the fat; then, before serving, crank up the heat on a burner and reheat them, scraping up all the brown bits on the bottom of the pan with a metal spatula. That’s the best part. Carve up the chicken–cut off the legs, wings, breast, etc.–and serve with the vegetables on the side. If there’s any liquid left in the pan, drizzle that on top and sprinkle everything with some chopped parsley (or, in my case, chives because that’s what I had). If you’re looking to impress, this dinner does the trick every time. And it’s such an important thing to have in your repertoire; so let this be your inspiration. You got this.
Source: amateurgourmet.com
I recently wrote an essay for Thomas Keller’s magazine Finesse, for an issue themed evolution. Having worked so closely with Keller over the past twenty years, I asked to write about his evolution, as I’ve always been fascinated by it and wrote about it in Soul of a Chef. He’s still the same, but not the same. He’s evolving. Some things stay the same, some things must change. The salmon tartare in a savory tuile has been on the menu since day one. It was my first bite at the most memorable meal of my life on July 14th, 1997 (I read the scene here if you want to listen to it.) Other dishes vanish to be replaced by new ones. Having written the essay and wanting to return to per se, which took a Read On »
Source: ruhlman.com
(First published in Finesse, Thomas Keller’s superb magazine, earlier this year.) In the 1970s, the egg was bad-for-you food in America. After being a mainstay of the human diet for millennia, doctors here decreed that the cholesterol-laden yolk clogged arteries and resulted in heart attacks. Eat an egg if you must, nutritionists warned, but only in limited quantities. And after 30 years of telling us to avoid eggs and order up those egg white omelettes, the American Heart Association changed its mind—oops!—and declared that eggs, like an unjustly punished child, could once again return to the dining table. As I began to write about the egg, I realized the egg fatwa was no isolated event. Indeed, it came to symbolize for me what was wrong with the way we think about food and how we let others decide what we eat. Read On »
Source: ruhlman.com
Reposting this method because, well, just the name of the dish is inspiring: butter-poached shrimp. Butter-poached shrimp and grits. Mmmm. Butter-poached lobster, not uncommon in French haute cuisine, was popularized in America by Thomas Keller in The French Laundry Cookbook and at that restaurant. “Lobster loves gentle heat,” he told me then. It’s not much of a leap for the thrifty-minded cook to reason that shrimp, too, love gentle heat. That’s why, in the butter chapter of my book Ruhlman’s Twenty, I showed how to use butter as a cooking medium (one of the many amazing ways butter can be used as a tool). This dish is absolutely killer. The shrimp stay very tender, rich and tasty with the butter; the grits are then enriched with the shrimp butter. Leftover butter can be used to saute shrimp Read On »
Source: ruhlman.com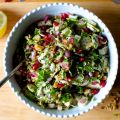
Things I Learned Hosting My First Friendsgiving On logistics β’ As I realized last week, what makes big meals (we had 16 people) scary isn’t the cooking as much as the sheer volume of it all and the logistics required to manage them. I mean, who here has a kitchen that was built to feed 16? Trust me, it’s not you, it’s your kitchen making things hard. β’ Thus the more time you spend plotting things out, the less stressful it will be. Because I’m Team Casserole, i.e. I prefer dishes that are deep and bubbly, can be made well in advance and reheat well, they’re all fairly forgiving of too long or short warming times. Too long, they get a little extra crunchy and toasted on top (yum), too little, they still pack a lot of warmth inside, even if they’re not bubbling hot. I warmed all of the dishes before the turkey went in and then slid in one or two while it roasted. When the turkey came out and we needed 30 minutes to rest and carve it, all the sides went back in to warm. β’ Everything that can be done in advance, should be, and as early as possible. You’re doing it for you. When we have a lot of people over, this often leads to me quite over-exhausting myself the night before getting everything prepped that can be, but then I wake up rested and we’re 80% there. It’s not actually a stressful day, which means we’re far more likely to enjoy the party. If I can’t finish prep the night before, I’ll do it in the morning. It’s essential to me that there’s a little window of vegging/non-cooking time between prepping stuff and cooking the stuff that must be done at the last-minute. It’s also a great time to change into something fresh. β’ All the pies were made earlier in the week and either went into the fridge (pecan) or freezer (pumpkin) until needed. β’ Finally, I think we should all buy each other trivets for Christmukkah. I have… 4? What kind of Thanksgiving has only 4 hot dishes coming out of the kitchen? None we want to be at, thank you very much. About That Turkey β’ Turkeys are amusingly hard to find a week before Thanksgiving. β’ Brining is a delicious nightmare. I know a lot of people don’t do it. I know you don’t need to. I know there are less-insane options, like dry-brining. But I am really not hugely into turkey to begin with because I always find it dry and often flavorless. And I don’t want a little overcooking to ruin it. Thus: brining. Oh, but what a comedy it was and by comedy, I mean cry-laugh emoji. It involved a 19.5-pound bird, 1 of these bags and 2.5 gallons of brine, which turned out to create a forceful enough pressure on the bag to pop it open. Mopping was involved. Then I got it into the fridge (40 pounds, no easy feat and yet somehow still easier than that time I had to carry my 20-pounder out of the grocery store sideways with an arced back… life math be crazy) and discovered that the bottom had a tiny hole in it and I don’t know if normal people whose mothers were not microbiologists list salmonella among their greatest fears, but raw turkey juice everywhere in the fridge dripping into the produce drawers required a hazmat-suit level of cleaning until I could stop worrying. β’ Where’s the recipe, Deb? We were so happy with the turkey but I cannot in good conscience share with you a recipe for something so epic that I’ve only made once. I mean, what if I missed something major and ruin all of your holidays? So, I promise, it’s coming and it’s going to be worth the wait. The Menu β’ Ina Garten’s Baked Fontina (I hope to share a more budgeted version of this soon) β’ Corn Muffins (brought by a friend) β’ A Giant Kale Caesar made with a riff on this dressing. I’d intended to make this salad, however. β’ A Roast Turkey Mash-Up That Was About 50% Thomas Keller, 30% Gourmet and 20% Alton Brown β’ Cathy Barrow’s Challah Stuffing With Mushroom and Celery with homemade challah, because crazy things happen in my freezer β’ Green Bean Casserole with Crispy Onions (doubled) β’ Roasted Delicata Squash with Brown Butter, Lime and Pepitas, except I ran out of time so they were just roasted β’ Root Vegetable Gratin β’ Baked Beans (brought by a friend) β’ Ree Drummond’s Twice-Baked Potato Casserole (brought by a friend) β’ Cranberry Sauce (brought by a friend, the one who taught me to make my own back in the day) β’ Cheesecake-Marbled Pumpkin Slab Pie β’ A Very Large Pecan Pie β’ By the way, we made everything above except the gravy and obviously the turkey vegetarian simply by using vegetable stock; it wasn’t a challenge and nobody missed out on a thing. For the twice-baked potatoes, an area was left bacon-free on top. Postscripts β’ Do not underestimate the power of one really great, crunchy salad, the perfect contrast to all the butter-drenched and gluten-full wonders across the table. It goes quickly. I’m sharing today the salad I’d intended to make; I think it’s the perfect last-minute addition to any menu and so easy to bring with you from home. I guarantee the host will appreciate it. β’ Finally, ask me anything! I feel like I know 100x as much about Thanksgiving as I did 72 hours ago and most of what I did is very fresh in my head. I’m happy to answer any questions you have in the comments below. I’ll probably attack them mostly this evening, so don’t fret if you don’t get an immediate response. Previously One year ago: Roasted Leek and White Bean Galettes and Date Breakfast Squares Two years ago: Classic Pecan Pie with Praline Sauce and Crispy Sweet Potato Roast Three years ago: Green Bean Casserole with Crispy Onions, Apple-Herb Stuffing for All Seasons, Cauliflower with Brown Butter Crumbs and Parsley Leaf Potatoes Four years ago: Cauliflower-Feta Fritters with Pomegranate Five years ago: Gingersnaps and Sweet Potato and Marshmallow Biscuits Six years ago: Creamed Onions with Bacon and Chives and Sweet Corn Spoonbread Seven years ago: Sweet Potato and Buttermilk Pie, Creamed Spinach and Gingerbread Apple Upside-Down Cake Eight years ago: Silky Smooth Pumpkin Pie, Home Fries, Apple Pancakes and Fennel Proscuitto and Pomegranate Salad Nine years ago: Pumpkin Waffles and Creamy White Polenta with Mushrooms and Nutmeg-Maple Cream Pie Ten! years ago: Three Cranberry Sauces and No-Knead Bread And for the other side of the world: Six Months Ago: Roasted Carrots with Avocado and Yogurt and Almond Rhubarb Picnic Bars 1.5 Years Ago: Fake Shack Burger and Swirled Berry Yogurt Popsicles 2.5 Years Ago: Soft Pretzel Buns and Knots 3.5 Years Ago: Greek Salad with Lemon and Oregano 4.5 Years Ago: Vidalia Onion Soup with Wild Rice Brussels Sprouts, Apple and Pomegranate Salad This is a crunchy, bright abundantly November-ish salad that hails from Michael Solomonov’s Zahav cookbook. In the book, he calls it tabbouleh and explains that while in the U.S., tabbouleh is usually made with bulgur wheat, parsley and chopped tomatoes, in Israel, you’re unlikely to find it made the same way twice, and I’d say the same for Solomonov’s versions too. In the book, he’s swapped kale for parsley but I’ve also seen him do the same with shredded brussels. He says he enjoys swapping quinoa for the bulgur, and adding pomegranate when it is in season. In the fall, he said he enjoys adding apples and walnuts, and will sometimes even replace the grain entirely with walnuts. And it from here that we’ve ended up with a dish I won’t even call tabbouleh, so not to confuse anyone, but a salad, and an excellent one at that. Between his book and the various outlets that have published versions of this salad, I found almost no two recipes alike so I instead set out all the ingredients and added them at the levels I liked most. You, too, can and should adjust the flavors to taste. 1/2 large red onion, diced small2 tablespoons red wine vinegar2 teaspoons ground sumac1/4 teaspoon kosher salt, plus more to season salad2 cups shredded brussels sprouts1/2 cup fresh pomegranate seeds (from about 1/2 a large one)1/2 a large unpeeled apple, cored and diced (I used Granny Smith, the book recommends Pink Lady or Honeycrisp)Juice of half a lemon, plus more to taste1 1/2 to 2 tablespoons honey, plus more to taste1/4 cup olive oil3/4 cup toasted, cooled walnuts, lightly crushed or coarsely choppedGround chipotle chile pepper, urfa biber peppers, hot smoked paprika or another chile flake, to taste Make the sumac-pickled onions: Combine red onion, wine vinegar, sumac and 1/4 teaspoon kosher salt in a small dish and set aside while you prepare the other ingredients, or ideally at least 15 minutes. Combine all salad ingredients, including red onions and their pickling liquid, in a medium bowl and season to taste with salt and red pepper. Taste and adjust ingredients as desired — I’ve seen versions of the recipe with more honey, olive oil and lemon; I didn’t need them but you might find you do. This salad can be prepped ahead, but I’d keep the dressing off of it until at most an hour before serving so it doesn’t discolor the sprouts.
Source: smittenkitchen.com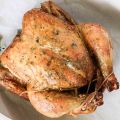
Want the most golden, most crispy skin on anything from your Sunday roast Chicken to your Thanksgiving turkey? We tested four different methods to find the very best one. Photography Credit: Summer Miller Iβve been wrist deep in the business end of chickens all week. Iβm on a quest to determine the best way to achieve perfect deep, golden, crispy skin, both for our everyday roast chickens and also for that bird of all birds — the Thanksgiving turkey. Why? A well-roasted bird makes an undeniably beautiful presentation on your holiday table. Also, of course, the snap of salty, crisp skin with each tender morsel of meat is a little bite of heaven. In the end, we want a bird with tender, flavorful meat, and deeply golden, crispy skin. The goal is to inject the meat with moisture while eliminating it from the skin. DRY SKIN = CRISPY SKIN Ultimately, you want dry skin. The drier your skin to start, the crispier it will be after roasting. Different cooks and chefs have varying techniques for doing this. Some leave the chicken uncovered in the refrigerator (a technique I support), others use salt and or baking powder to draw the moisture out of the skin, and some simply pat the bird dry with paper towels, pop it in the oven and hope for the best. I tested four different techniques to evaluate their effectiveness at creating golden, crispy skin. I tested with chickens rather than turkeys to save time, money, and limit the amount of poultry my family had to eat in a single week. (As it is, theyβve made me promise not to serve chicken for a least a month.) What works for one bird will likely work for another, so you can apply any of the techniques outlined below to any kind of poultry β including, yes, your Thanksgiving turkey. TESTING METHOD I tested four different methods for achieving crispy, golden skin: Dry the bird with paper towels, then roast Rub with baking powder mixture Air-dry for 24 hours Air-dry and baste during roasting To ensure accurate results, I applied a few standards to all the chickens. First, all the chickens were between 5 and 6 pounds. Two were from the supermarket, and two were from a farmer down the street from my house. All chickens were trussed and set on the counter to come up to room temp for 30 minutes before I popped them in the oven. For this test, I was most concerned with the crispness and color of the skin, so I didnβt worry about the flavor of the chicken until the end, adding herbs, or stuffing the cavity. However, I still wanted the chicken to taste good, so except for Chicken No. 2 (see below), I seasoned each one with 2 teaspoons of kosher salt, 1 teaspoon of freshly cracked pepper, and 1/2 teaspoon of dried thyme. All the birds were roasted in on a sheet pan lined with parchment with a wire cooling rack placed on top. This allows air to circulate under and around the chicken, similar to roasting a turkey in a roasting pan with a roasting rack. I roasted the chickens on the second lowest rack in the oven and used Ina Gartenβs recommendation for cooking time: 1hr and 30min at 425-degrees Fahrenheit for each bird. THE RUNDOWN Each method produced at least some color and a bit of crispness, so even on your least motivated day in the kitchen, you can make a decently crispy, golden chicken. The exact method you use depends on how much time you have and how loyal you are to crispy skin. Chicken No. 1: The Quick Pat Down This first chicken served as my control. It required the least amount of effort and still provided some level of crisp skin. I simply patted this chicken dry with paper towels, then rubbed it with two tablespoons of olive oil on the outside of the skin, under the skin, and inside the cavity of the bird. I combined the salt, pepper, and thyme together then rubbed the spice blend in all the same places. The result after roasting was lightly golden, slightly crisp skin. Basically, consider this bird the “I donβt have any time, but itβs cool, I can still pull off dinner” bird. You arenβt going to win any awards for this one, but it still gets the job done. Chicken No. 2: Baking Powder Rub This was a technique I pulled from Serious Eats, and the author swears by using baking powder to achieve a super crispy chicken. This chicken was rubbed down in a mixture of 1 tablespoon of salt, 1 teaspoon of baking powder, and 1/2 teaspoon of cracked pepper, then left uncovered in the fridge for 18 hours. This chicken definitely had some crackling skin, but some parts looked a bit leathery and the color was actually lighter than the first bird. The meat was tender and flavorful, but there was a very slight, subtle metallic flavor from the baking powder. Chicken No. 3: The 24-Hour Chill I left Bird Number 3 uncovered in the fridge to air-dry for 24 hours, following the technique espoused by Thomas Keller and several other chefs. Then I used the same combination of oil, salt, pepper and thyme I used for Chicken Number 1 to season and assist crisping the skin just before putting it in the oven. This attempt yielded a beautiful golden color and a nice, crispy skin. The flavor of this bird was the best of those I’d tested so far. The meat was tender and not dry, but trying to season the bird under the skin after air drying proved difficult. More on that later. Chicken No. 4: Because Iβm All About that Baste, about that Baste. To baste or not to baste, that is the question! My editor and I both read various accounts debating the merits of basting, so we felt it was worth the time to put this method to the test. I prepared Chicken Number 4 exactly as I prepared Chicken Number 3. The only difference was that I basted the chicken during roasting using the pan drippings. I donβt even have a proper baster, I just used a large spoon to scoop up and drizzle that chicken in all the fat it was working so hard to burn off. I didnβt want this one to win because I donβt like things that require more work, but Grandma knew what she was doing. I basted the chicken every 20 minutes during the 1 1/2 hour roasting time, and it was gorgeous. This bird had a deep brown color, and the skin was nice and crisp. It was the obvious winner. Chicken No. 5: Bonus Bird! I now knew that air-drying and basting created a beautiful bird, but trying to season a bird under the skin after drying it for 24 hours wasnβt the easiest. I took the time to test one more chicken, this time seasoning it before air-drying instead of after. For Bird Number 5, I created a paste of salt, pepper, thyme and one tablespoon of olive oil, and rubbed it on top of and underneath the skin. Then I left it uncovered in the fridge to dry for 24 hours. Just before roasting, I rubbed the outside of the skin with 1 tablespoon of olive oil. I then basted it every 20 minutes as it cooked. The result was a chicken that was easy to season, had deep richly colored, crisp skin, and tender flavorful meat. Visually, it looked exactly the same as Bird Number 4, but the flavor was much better. CONCLUSION Iβm a big believer in the “less is more” philosophy in the kitchen, so if I could make a perfectly beautiful, and delicious bird without too much fuss, then that’s a win for me. Unfortunately, thatβs not exactly how this test turned out. In conclusion, if you want the crispiest, most golden skin on your bird this holiday season, or your next Sunday night chicken, the best way is to rub it with oil and spices under and over the skin, then leave it uncovered in the refrigerator for 24 hours. Rub it down with one more tablespoon of oil just before putting it in the oven, sprinkle with a bit more salt and pepper. Roast and baste the chicken every 20 minutes. Sometimes a little bit of planning and extra effort is well worth the payout. Follow me on Pinterest If you make this recipe, snap a pic and hashtag it #simplyrecipes β We love to see your creations on Instagram, Facebook, & Twitter! Summer Miller Summer Miller is a freelance writer, recipe developer and author based in Nebraska. Her work has appeared in Bon Appetit, Eating Well, Grit, SAVEUR, and Every Day with Rachel Ray, among others. Her first book is New Prairie Kitchen (Agate Publishing, 2015). More from Summer
Source: simplyrecipes.com